Using Websockets with the Webex JavaScript SDK
August 1, 2025
This blog post was originally published in September 2019 and has now been updated for 2025.
Most developers who have created applications for Webex are familiar with the concept of Webhooks. Webhooks are registered on resources like ‘messages’ or ‘memberships’ to notify applications of events on these resources. When the registered event has occurred - for example a message was created or a membership was deleted - an HTTP POST event with a JSON payload is sent and your application can react to it accordingly.
When your application runs as a web server using a publicly-accessible URL, you don’t need to do much else beyond creating a webhook and having an app running at the webhook's targetUrl to process the webhook payload. This approach can be a problem though if your app needs to run behind a corporate firewall or in restrictive environments. To get around this problem, we recently introduced functionality in the Webex JavaScript SDK that allows applications to "listen" for Webex messaging events using websockets, a technology that does not require a web server running on a public IP address.
Websockets are persistent connections established over HTTP that allow direct communication between servers (the Webex API in this case) and clients (the Webex JavaScript SDK). In this post, we will walk you through creating and using websockets to listen for events sent from Webex.
Websocket example
Websockets are not created by sending a POST request to the API like you would to create a webhook. Websockets are created programmatically with the help of the JavaScript SDK, as they're a unique concept that requires additional behind the scenes setup.
Websocket listeners can be created for memberships, rooms, messages, or attachmentActions. Each of these resources has a listen() method in the JavaScript SDK, which you need to call in order to start your websocket. Once the listener is started, you can specify the type of event you would like to be notified about, by calling the on() method. As mentioned earlier, there is no need for a targetURL, like you need for a webhook, because the events from the server are not sent via HTTP. Instead, they're routed through the websocket, and any on() handlers you have registered for the event are called directly by the SDK.
Applications which use the Webex JavaScript SDK can make use of websockets today! Additionally, support for websockets has been added to the Node Flint framework.
If your application isn't written in JavaScript, don't worry, you can still take advantage of websockets. In the following sections, we will go through each step of creating a node.js based websocket listener app, built specifically to forward Webex events to another locally running application. In this sample, we will listen for "message:created" events and forward them to a specified localhost/PORT. On the other side of it, we will have a sample Java app listening on localhost/PORT, interpreting the request and sending a reply to the room the message was sent from.
Requirements
The node.js app
Before getting started with websockets, make sure you have everything that's needed to get up and running with Node.js and NPM - more information can be found in the Node.js SDK documentation and the JavaScript SDK's GitHub repo. Once you have that covered, go the hookbuster example repo and follow the instructions for installation.
The Java app
Our app uses Maven to build the project, so you will need that set up before you can run the example. You will also need Java 1.6 or higher installed. Once both are functional, open the GitHub repo and follow the instructions to install and run it.
Everything else
You will also need a bot access token (it's much easier and simpler to test with a bot token vs an integration token accessing your personal data). Even though you won't need the token in the application code itself, it will be necessary later to run the demo. To create one, see our Bots Guide and hang onto the access token for now.
Creating a Websocket listener -- the node.js app
Step 1: Authentication
Once the node.js app is up and running, per the instructions mentioned in the Github repo earlier, you'll need to provide it with an access token. This will be entered in the console and we need to use it to make the demo functional. The token is then used to initialize a Webex object, which is used to communicate with the Webex API. Here is the code where we retrieve the access token provided in the Console:
function _initializeWebex(accessToken) {
    webex = Webex.init({
        config: {
            logger: {
                level: 'error'
            }
        },
        credentials: {
            access_token: accessToken
        }
    });
    webex.once('ready', () => {
        console.log(fonts.info('Webex Initialized'));
    })
}
To make sure the access token is valid, we do a call to the Webex API's /people/me endpoint:
return new Promise((resolve, reject) => {

    webex.people.get('me').then(person => {
        resolve(person);

    }).catch(() => {
            reject('not authenticated');
        }
    );
});
We use this call to do the validation because everyone has access to view the "person" associated with the token they're using; it will rarely fail for any other reason besides the access token being invalid.
Step 2: Start listening
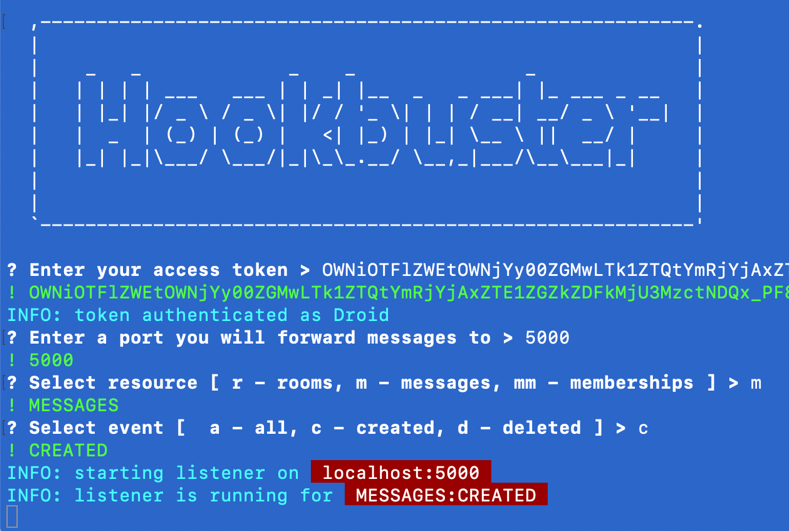
The app will then ask for a destination and a port that it will use for forwarding the incoming websocket events to via POST request; in our example, we will use port 5000 but you can set that to whichever port you prefer.
After that, we will be prompted to select our resource and event. We will select messages and created, respectively. This will start the websocket listener and it will then listen for incoming messages. Please note - only messages where our bot is mentioned will be triggered; this is because bots are restricted and can only access messages where the bot is explicitly mentioned. Here is a screenshot showing both steps 1 and 2:

This is the node.js code triggered by the above console commands for the resource and event selection:
webex.messages.listen().then(() => {

    //logging a formatted info message in the console
    console.log(fonts.info(
        'listener is running for ') +
        fonts.highlight(` ${resource.toUpperCase()}:${event.toUpperCase()} `)
    );

    webex.messages.on(event, request => {

        let request_string = JSON.stringify(request);
        _forwardRequest(request_string);

});


}).catch(reason => {
    console.log(fonts.error(reason));
});
Step 3: Forward the request
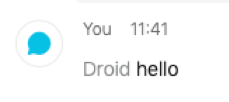
Make sure the Java application for the bot is also running, and then send a simple message to the bot via Webex. Since 'hello' is all our Java bot is built to understand, we will only send that command. We're sending the test via a group space, but a direct message would work as well:

As soon as the message is posted, the server triggers a POST request, the same way it would for a webhook. The difference is, instead of a public targetURL, the message is sent to our websocket because we registered a listener for all messages created for our bot (we told the system to listen for our bots messages specifically, when we entered our bot access token in the node.js app earlier). Once the message reaches our running code, it is directly forwarded to localhost:5000, as shown below:
function _forwardRequest(request) {

    //logging info to the console
    console.log(fonts.info('request received'));

    //gathering some details
    const options = {
        hostname: 'localhost',
        port: specifications.port,
        method: 'POST',
        headers: {
            'Content-Type': 'application/json',
            'Content-Length': request.length
        }
    };

    //creating the forward request
    const req = http.request(options, res => {
        console.log(`statusCode: ${res.statusCode}`);
    });

    req.on('error', error => {
        console.log(fonts.error(error.message));
    });

    //sending the request
    req.write(request);
    req.end();

    console.log(fonts.info(`request forwarded to localhost:${specifications.port}`));
    console.log(fonts.info(request));
}

Step 4: Stop listening
This might seem like we're getting a little ahead of ourselves, but it is important to note - if we do not clean up the listener after it is no longer needed, we might run into trouble later. This is why our node.js app stops all listeners once you exit the app. The following code handles the clean up process:
webex.messages.stopListening();
webex.messages.off(event);
Listen to incoming request -- the Java bot application
Step 1: Authentication
Just like our node.js websocket listener app, our Javabot application needs an access token to function. After you start up the app, it will ask for the token. Here we use the same bot token as before, because we want to post our simple replies with the same identity. After entering the token, it is verified with the below code:
private static boolean verifyAccount(String accessToken) {

    boolean isValid = false;
    Bot bot = new Bot(accessToken);

    try {
        Console.printInfo("Verifying account");
        Person me = bot.getMyDetails();
        isValid = true;
        Console.printInfo("Account verified as " + me.getDisplayName().toUpperCase());

    } catch (Exception e) {
        Console.printError("Access token invalid");
    }

    return isValid;
}
The verification is done by our Bot object, which is actually a wrapper for the Java SDK's Spark object:
public Person getMyDetails() {
    return spark.people().path("/me").get();
}
Step 2: Start listening
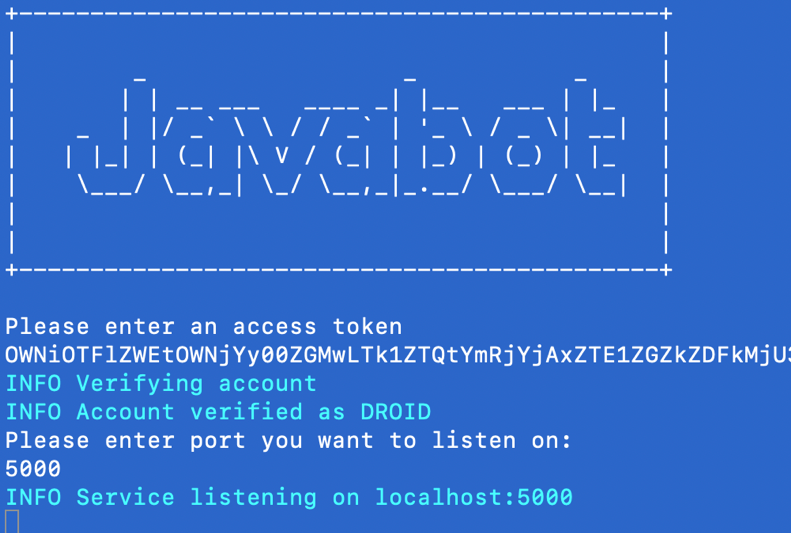
The only other parameter needed for our Java app is a port to listen on. We will use the same 5000 port, that we used with the node.js app.
This is all we need to start listening for incoming requests on localhost:5000. With the parameters gathered and verified, we can now instantiate the socket and begin accepting incoming messages using the following code:
public void run() {

    Console.printInfo("Service listening on localhost:" + port);

    try {
        ServerSocket serverSocket = new ServerSocket(port);

        while (true) {

            try {
                //waits for incoming request
                Socket socket = serverSocket.accept();

                JSONObject requestBody = getRequestBodyFromInput(socket);
                evaluateRequest(requestBody);

            } catch (Exception e) {
                Console.printError(e.getMessage());
            }
        }
    } catch (IOException e) {
        //socket already in use
        Console.printError(e.getMessage());
        Console.printError("Service not running");
    }
}
Here is a screenshot showing the Console workflow for the above code:

Step 3: Evaluating the request
Once we receive our "hello" message from the node.js app, the request is interpreted using the below code:
private void evaluateRequest(JSONObject requestBody) {

    //print info to the console
    Console.printInfo("Request received");
    Console.printInfo(requestBody.toString());

    String resource = (String) requestBody.get("resource");
    JSONObject data = getDataObjectFromJson(requestBody);
    String roomId = (String) data.get("roomId");

    if (resource.equals("messages")) {
        String messageId = (String) data.get("id");
        Message message = bot.getMessageById(messageId);

        if (!message.getPersonEmail().contains("@webex.bot")) {
            //split the message along spaces
            String[] trimmedMessage = message.getText().split("\\s");
            //convert the message array into a searchable list
            ArrayList<String> messageList = new ArrayList<>(Arrays.asList(trimmedMessage));

            if (messageList.contains("hello")) {
                bot.sayHello(roomId);
            }
        }
    }
}
Step 4: Sending a reply
The Java SDK includes prebuilt methods we then call to send the actual reply back to the space/room where the original "hello" originated:
void sayHello(String roomId) {

    Message message = new Message();
    message.setRoomId(roomId);
    message.setMarkdown("hello there \uD83D\uDC4B" );
    spark.messages().post(message);
}
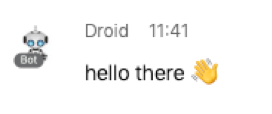
This is how it looks like, back in Webex:

If you have any questions, please don't hesitate to contact our Webex Developer Support team.