Create
Developer Guide
The general approach to developing embedded apps is similar to developing any other web app.
The main difference is that your app runs within the context of a Webex Meeting or Space, rather than in an external web browser. Embedded apps integrate with the Embedded App Framework to enable the following features:
- Ability to start an "Open for all" session with Meeting participants, or "Add to Tab" functionality in a Space.
- Get information about the meeting or messaging space host and user information (if permitted by the user or organization), Webex or Meeting Center theme color (light or dark, for example), and other details.
- Respond to events emitted by the framework about changes to the app's environment (theme change, for example), changes to the meeting host or space , or display context (sidebar or pop-out window).
As of Webex app version 44.3, we’ve integrated the Webex AppHub natively into the Webex app itself, allowing your users to explore Apphub to discover apps and bots without the need to leave the Webex application! For more information, see What's New.
If you are not currently a Webex customer you can request a developer sandbox to start developing embedded apps. Free Webex user accounts cannot be used to create embedded apps.
The Embedded Apps version 1 SDK has been deprecated and will be supported based upon the following support policy. For new customers accessing this page, please see the Embedded Apps version 2 SDK API Reference. For existing version 1 SDK customers, please see Migration from 1.x to 2.x. New features will only be added to the version 2 SDK.
The basic workflow for developing embedded apps is as follows:
- Create an embedded app in the Webex Developer Portal, providing the HTTPS URL of your app's starting page. At this point your app is in development mode is only visible to your Webex account.
- Enable Developer Tools in Meeting Center or Spaces so you can debug your app within the embedded context.
- Open the app in a Meeting or Space to test it. Publish changes or fixes to your web host, and use the Reload menu item available the right-click/control-click context menu to reload your app's resources. In this way you can quickly iterate on changes directly in the Meeting or Space.
anchorDeveloper Quick Start
anchorIn this quick start you'll create and test a basic embedded app in a Webex meeting and a Webex space. You'll learn the following:
- The basics of using the embedded app framework in a web application.
- How to create and configure your embedded app in the Developer Portal.
- How to test your app in Webex meetings and spaces.
- How to respond to events generated by the framework.
- How to retrieve user information with the Embedded App Framework API.
Prerequisites
The URL for your embedded app needs to available over HTTPS at a public URL. Similarly, any URLs that the initiator app shares with users with the setShareUrl() method must also be publicly accessible over HTTPS.
Before getting started, select the two URLs that you'll use for the initiator app and the shared app. For example, these URLs might be "https://www.example.com/start.html" and "https://www.example.com/shared.html". You'll need the first URL when you create your app on the Developer Portal, and the second when you're writing code to call setShareUrl().
About the App You'll Create
As explained in overview of embedded apps, a complete embedded app solution involves two parts:
- The initiator app that a user opens from the Apps tray in a Webex meeting or space. The purpose of this app is to open the URL of another embedded app with Webex meeting participants, or add as a tab to a Webex space.
- The shared app is the app at the URL shared by the initiator app.
In this tutorial you’ll create two static HTML pages to represent these two apps. In a real-world solution these would be applications that provide richer user interactions and experience but the same concepts will apply.
Create the Embedded App's Start Page
You'll start by creating the HTML start page for your embedded app. The URL for this page is loaded when a user opens the Apps tray in a meeting or space and clicks your app.
Create an HTML file named index.html and add the following code to it:
<html>
<head>
  <title>Embedded Apps Quick Start</title>
  <script src="https://binaries.webex.com/static-content-pipeline/webex-embedded-app/v1/webex-embedded-app-sdk.js" defer></script>
  <script src="./index.js" defer></script>
</head>
<body>
    <h1>Embedded App Quick Start</h1>
    <p>This is the initiator app. Its job is to specify a URL to share. Click <b>Set Share URL</b>, then click either <b>Open for all</b> (when running in a meeting) or <b>Add to tab</b> (when running in a space).</p>
    <button onclick="handleSetShare()">Set Share URL</button>
    <h2>Event Log</h2>
    <ul id="console" />
</body>
</html>
Note the following about this HTML:
- The first
<script>tag loads the Embedded Apps JavaScript library. Note thedeferattribute on the script tag. - A second
<script>tag that loads your app'sindex.jsfile, which you'll create next. Note thedeferattribute on this script tag, as well. Scripts with this attribute execute in the order in which they appear in the document. This way you can be sure the framework has loaded before your app attempts to use it. - A
<button>element that will be used to call setShareUrl(), passing it the URL to be opened with meeting participants, or added as a tab to a space. You'll define thehandleSetShare()function specified by the"onclick"attribute next. - A
<ul>element used to display log statements. The nativeconsole.log()function is also available to your app (once you've enabled developer tools in Meeting Center and Webex) but this provides an easier way to view app output.
- The first
Save your changes to index.html. Next you'll create the app's
index.jsJavaScript file.Create a JavaScript file named
index.jsand add to it the following code:// Create a new Webex app instance var app = new window.Webex.Application(); // Wait for onReady() promise to fulfill before using framework app.onReady().then(() => { log("App ready. Instance", app); }).catch((errorcode) => { log("Error with code: ", Webex.Application.ErrorCodes[errorcode]) }); // Button click handler to set share URL function handleSetShare() { // Replace this with the URL of your shared page var url = "https://www.example.com/shared.html" // "Shared App" is the title of the window or tab that will be created app.setShareUrl(url, "", "Shared App").then(() => { log("Set share URL", url); }).catch((errorcode) => { log("Error: ", Webex.Application.ErrorCodes[errorcode]) }); } // Utility function to log app messages function log(type, data) { var ul = document.getElementById("console"); var li = document.createElement("li"); var payload = document.createTextNode(`${type}: ${JSON.stringify(data)}`); li.appendChild(payload) ul.prepend(li); }Note the following about this code:
- It first creates a new Webex.Application instance. This is the main app object you'll use to set sharing URLs, register event listeners, get information about the app's context and environment, and more.
- The app.onReady() promise handler displays an "App ready" message in the app console if the promise is fulfilled, or an error code if the promise fails. Apps should always wait for the
onReady()promise to be fulfilled successfully before using the framework. The framework behavior's is undefined if used before theonReady()is fulfilled, or if the promise fails.
Save index.js in the same folder as index.html and publish them to your web host. Note the URL as you'll use it next to create your app on the Developer Portal. Next, you'll create the HTML page whose URL the initiator app shares.
Create the Shared Embedded App Page
Next you'll create the embedded app page whose URL is shared by the initiator app. For this example the shared page displays the ID of the current user using the app.context.getUser() method.
Create an HTML file named shared.html and add the following code to it:
<html>
<head>
    <title>Embedded App Test</title>
    <script src="https://binaries.webex.com/static-content-pipeline/webex-embedded-app/v1/webex-embedded-app-sdk.js" defer></script>
    <script src="./shared.js" defer></script>
</head>
<body>
    <h2>Shared page</h2>
    <p>This page was shared by the initator app.</p>
    <ul id="console" />
</body>
</html>
Like the start page HTML (except without the buttons) the shared app loads the framework JavaScript library and a custom script file (shared.js), which you'll create next.
Create a JavaScript file named shared.js in the same folder as shared.html that contains the following code.
var app = new window.Webex.Application();

// Wait for onReady promise, handle error scenario
app.onReady().then(() => {
    log("Application ready. App", app);
    // Display the ID of the current user
    app.context.getUser().then((user)=> {
        log("User ID", user.id)
    }).catch((errorcode) => {
        log("Error", errorcode)
    })
}).catch((errorcode) =>  {
    log("Error with code: ", Webex.Application.ErrorCodes[errorcode])
});

function log(type, data) {
    var ul = document.getElementById("console");
    var li = document.createElement("li");
    var payload = document.createTextNode(`${type}: ${JSON.stringify(data)}`);
    li.appendChild(payload)
    ul.prepend(li);
}
This code largely similar to that used in the iniator app but also displays the value of the
user.idfield returned by the app.context.getUser() in the app's log console.Save your changes to shared.html and shared.js and publish them to your web host.
Create your Embedded App on the Developer Portal
Next you'll create your embedded application on the Developer Portal. You'll need to provide the following information about your embedded app:
- If the app will run in a Webex Meeting, Space, or both. In this case the app will be available in both contexts.
- For meeting-based apps, provide a layout preference that determines if shared content opens in the app side bar, or in the main meeting view.
- The HTTPS URL of the initiator app (index.html) that you previously created.
- A list of valid domains for your start page URL, and for any URLs that will be shared by the initiator app. In this case the initiator page and shared page are being served from the same domain so there will only be one domain to add.
- App name, description, and icon, and other common app metadata.
For details on using the Developer Portal to create and configure embedded apps, see Creating an Embedded App in the Developer Portal.
To create your app on the Developer Portal:
Login to the Developer Portal and click Start Building Apps or select My Webex Apps from the profile menu in the upper-right.
Click Create a New App, then click Create Embedded App.
In the New Embedded App page enter the requested information for your application:
- Where does your app work? — Select both Meeting and Messaging.
- Embedded app name — App name that appears in Apps picker in a meeting or space.
- Description — App's description.
- Tag line — App's tagline.
- Icon — App's icon. Select one of the default icons or upload a 512x512px custom icon in PNG or JPEG formats.
- Start page URL — HTTPS URL of the initiator app that you created previously (for example,
https://www.example.com/index.html). - Valid domains — The domain(s) where you host your embedded application's start page URL, and any other URLs shared by the initiator app using setShareUrl().
Leave the other fields blank. The following shows the configuration for an sample in-meeting application.
Click Add Embedded App.
Now you're ready to test your app in a Webex meeting or space. At this point your embedded app is in development mode and is only visible in the Apps tray to you (the user who created the app). An app must be approved by your Web organization administrator before others can see it in your organization.
Open the Shared App in a Meeting
Next you'll start a meeting and open the initiator app. You will have 2 options:
- Either you'll click the Set Share URL button, and then click Open for all to open the app for other meeting participants. This will allow all meeting participants to collaborate over the opened app. To fully test the end-user experience you will need to invite another user in your organization to your meeting.
- Or you can click the Set Presentation URL button, and then click Share this content to screen share the initiator app screen to the rest of the meeting participants. Please note that this will provide a read only version of the app to the other participants.
You can either use Open for all OR Share this content at a time, they can not be used at the same time.
To test your embedded application in a meeting:
Start a new meeting and invite another user in your organization to join as a participant.
You must start the meeting using the Meeting Client desktop app, not the web app.
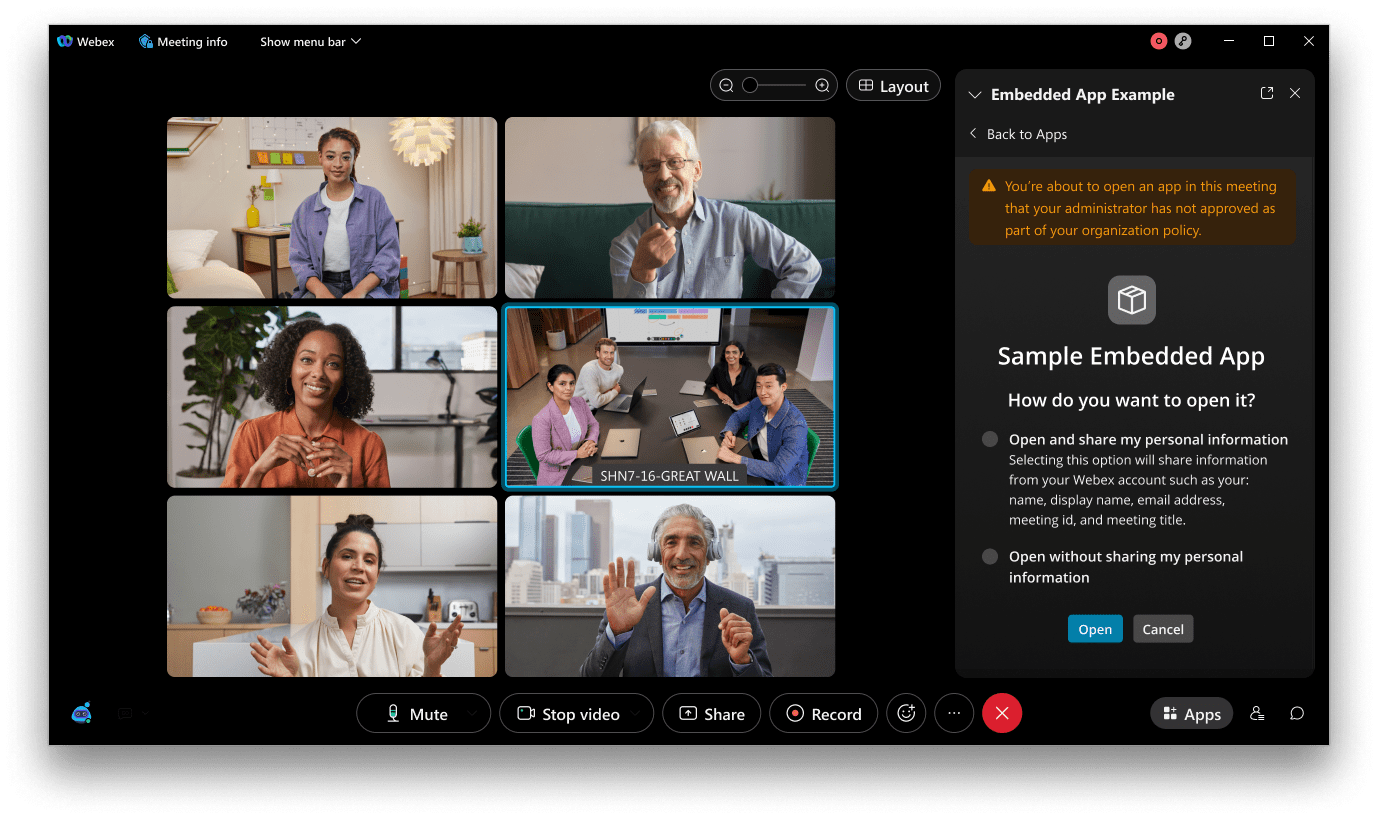
Click the Apps tray and then click your application in the tray to open it. Because the app hasn't been approved for use in your organization a privacy dialog appears first appears, as shown below. The app user can decide if they want to share their private information with the app or not. See About Access to Private Data in Embedded Apps for more information.
Select Open and share my personal information, then click Open. The initiator app opens and the "ready" message is logged to the app console, as shown below.
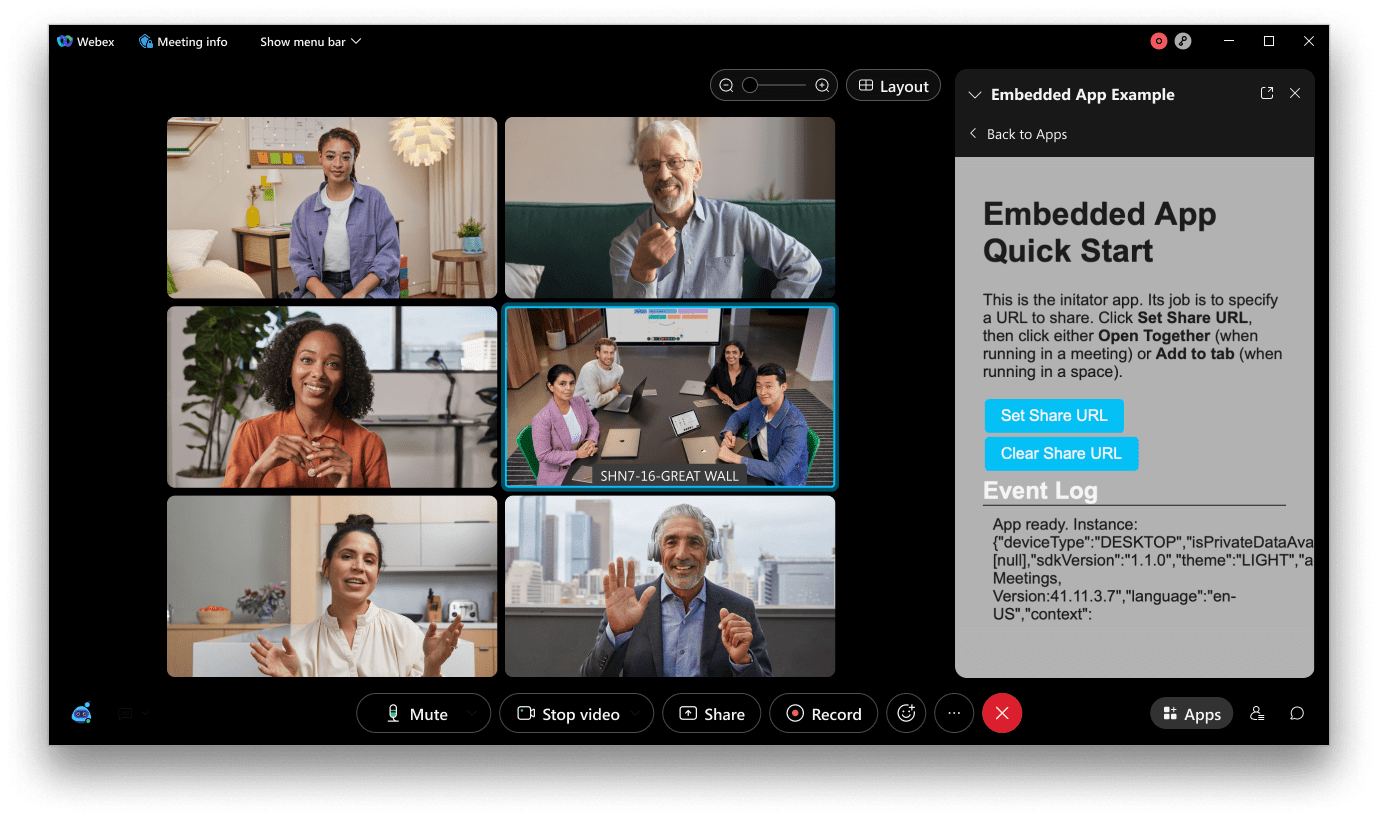
Click Set Share URL, which makes the Open for all button visible OR Click Set Presentation URL, which makes the Share app content button visible.

Click Open for all
In case of The meeting participant you invited sees a window open with the same privacy dialog.
Or if you click Share app content, in this case the meeting participant you invited will start seeing a screen share of your app.
The participant clicks Open and the URL shared by initiator app (shared.html) opens in the app window.
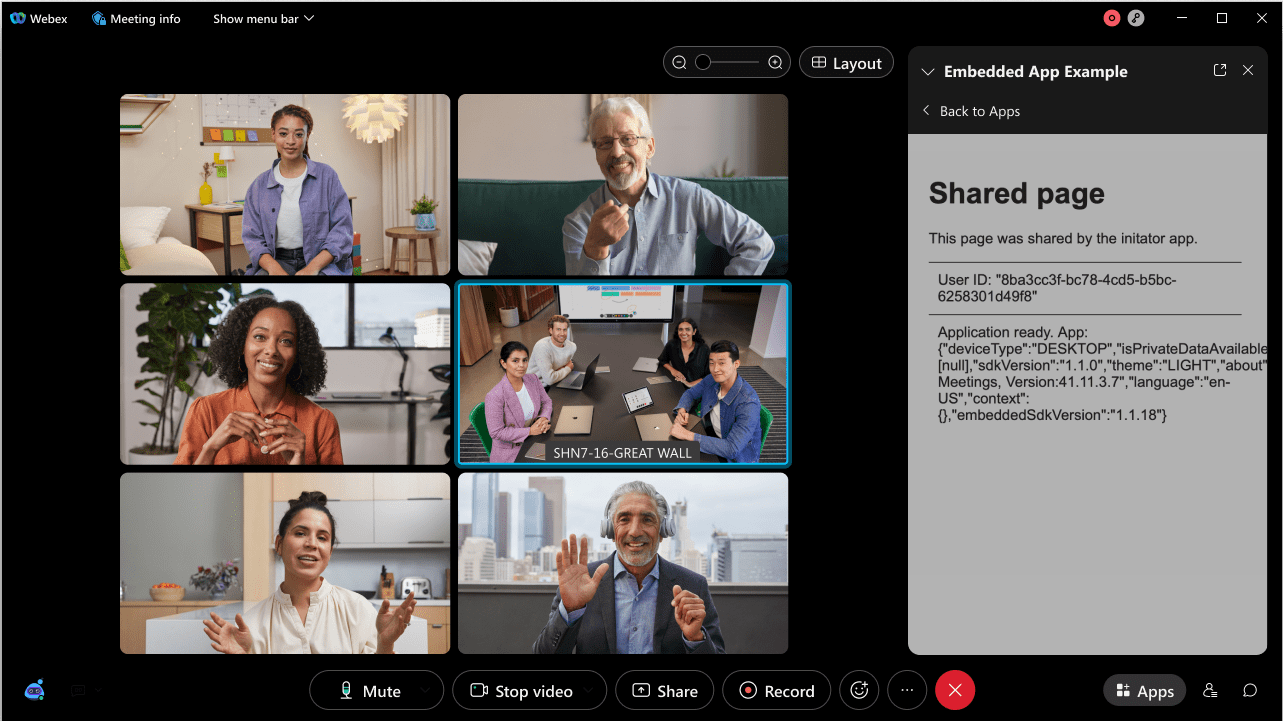
Note that the user ID is displayed in the app console.
In the initiator app, click Close for all, which has replaced the Open for all button. The app window closes for the meeting participant.
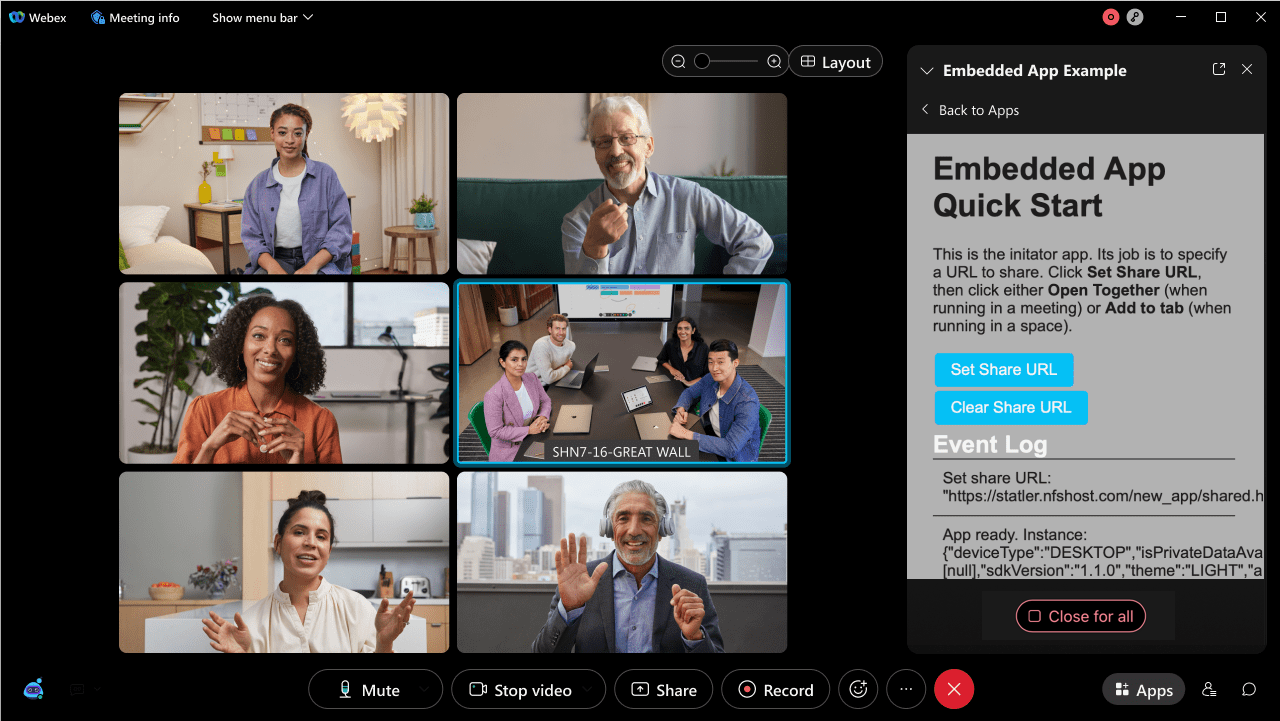
OR,if you have chosen to share app content, this button will be replaced by Stop sharing button, which will stop sharing the app's screen to the meeting participant.

Add the Shared App to a Space
Next you'll use the initiator app to add the shared URL as a tab to a Webex meeting space. Any user that's a member of the space can open and view the app.
To add your embedded application to a space:
In Webex and open an existing space, or create a new space.
Click the + Apps tab in the space to open the Apps dialog, and scroll to the bottom of the list to view in-development apps.
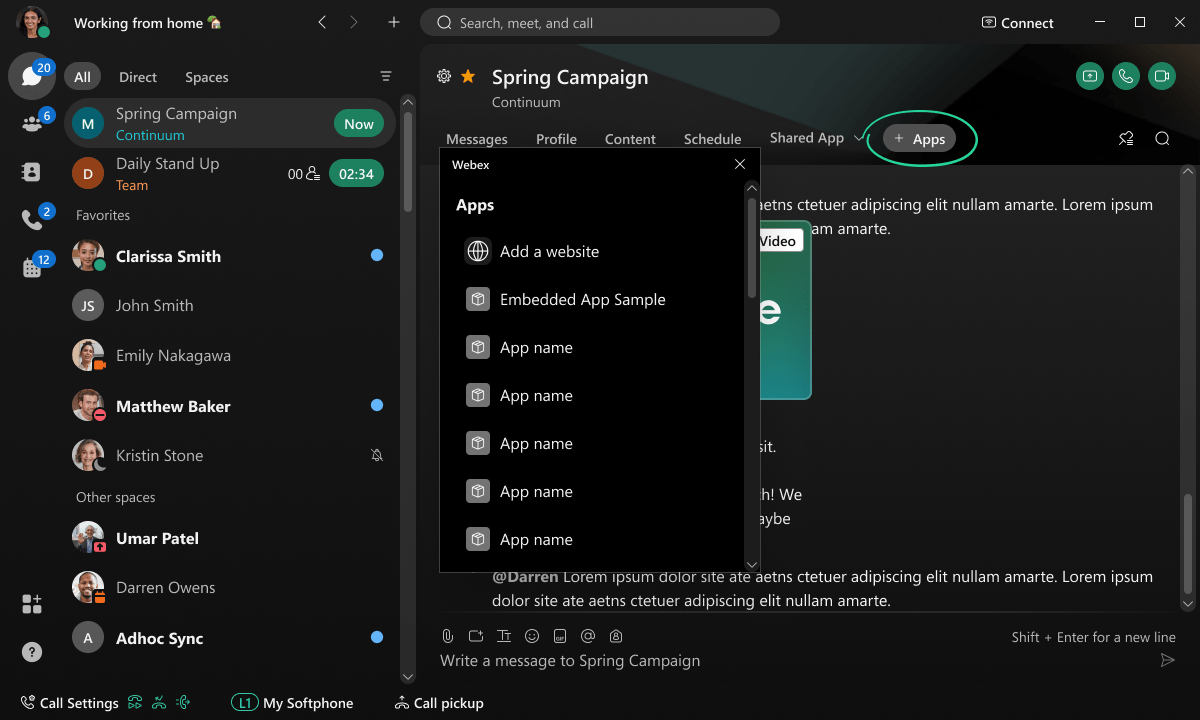
Click your app in the list. The same privacy dialog appears as in the meeting context.
Select a privacy option and click Open to open the initiator app.
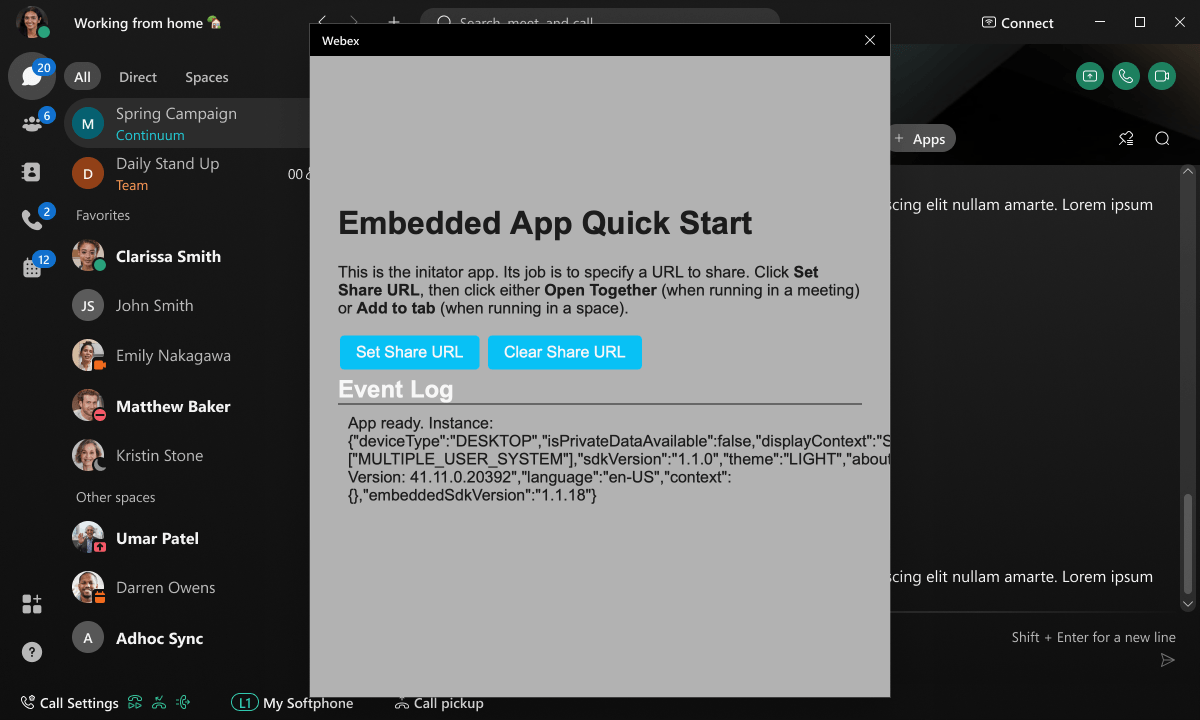
Click Set Share URL to enable the Add to tab button.
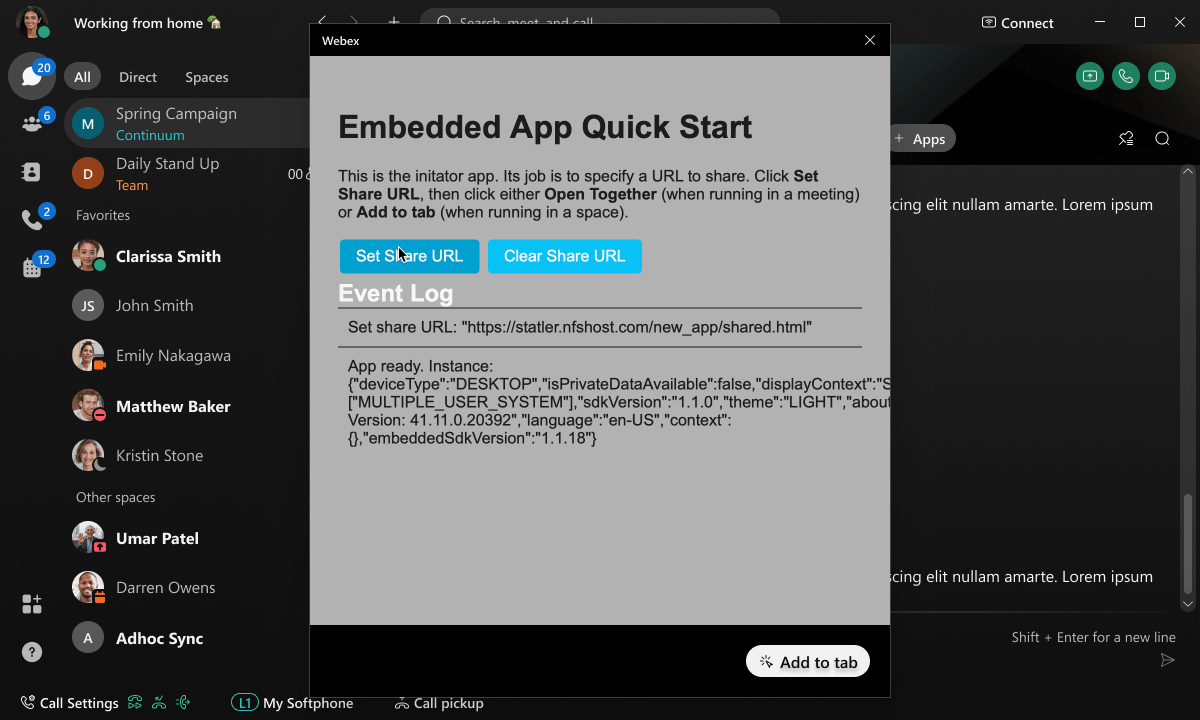
Click Add to tab. The app appears as a tab in the space. All users in the space can see the tab.
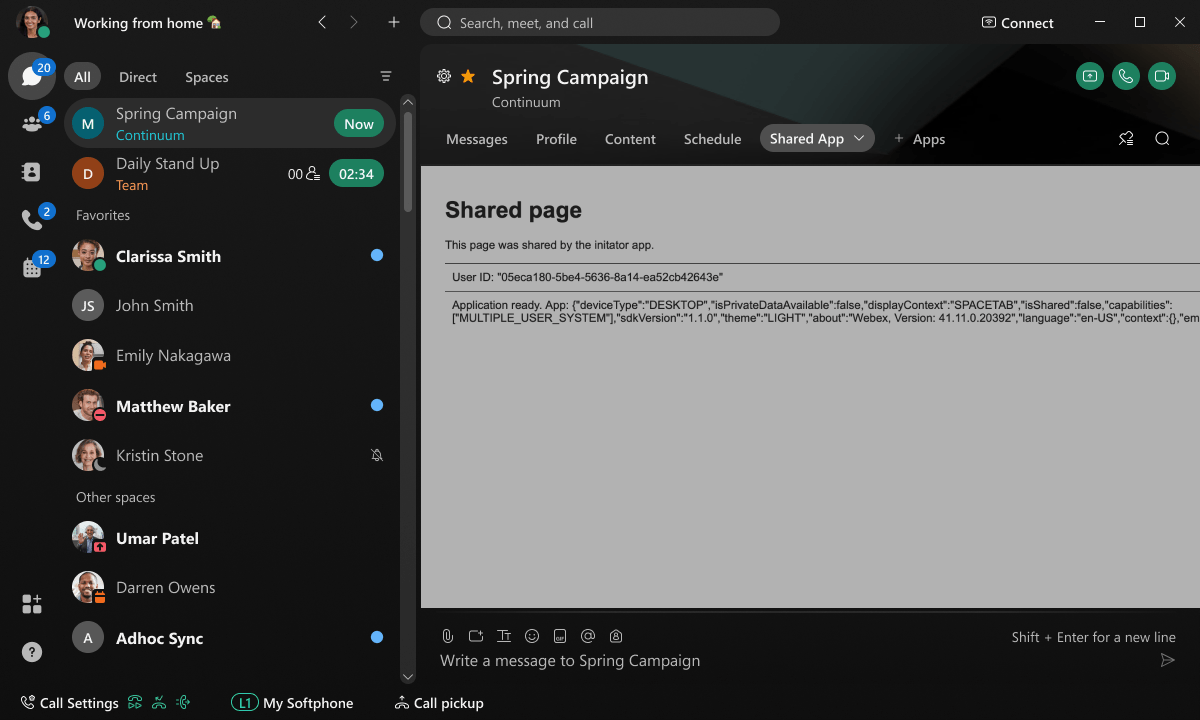
To add your embedded application to the Webex's app Sidebar:
An app can be also added to the sidebar of the Webex application outside the meetings and spaces or in addition to them. For a complete guide on how to build a sidebar app and its usage for call monitoring use cases, see Embedded Apps Framework Sidebar API Quick Start.
anchorCreating an Embedded App in the Developer Portal
anchorYou use the New Embedded App form to create an embedded app. See Embedded App Configuration Options for description of form fields.
To create an embedded application:
Login to the Developer Portal and open the New Embedded App submission page.
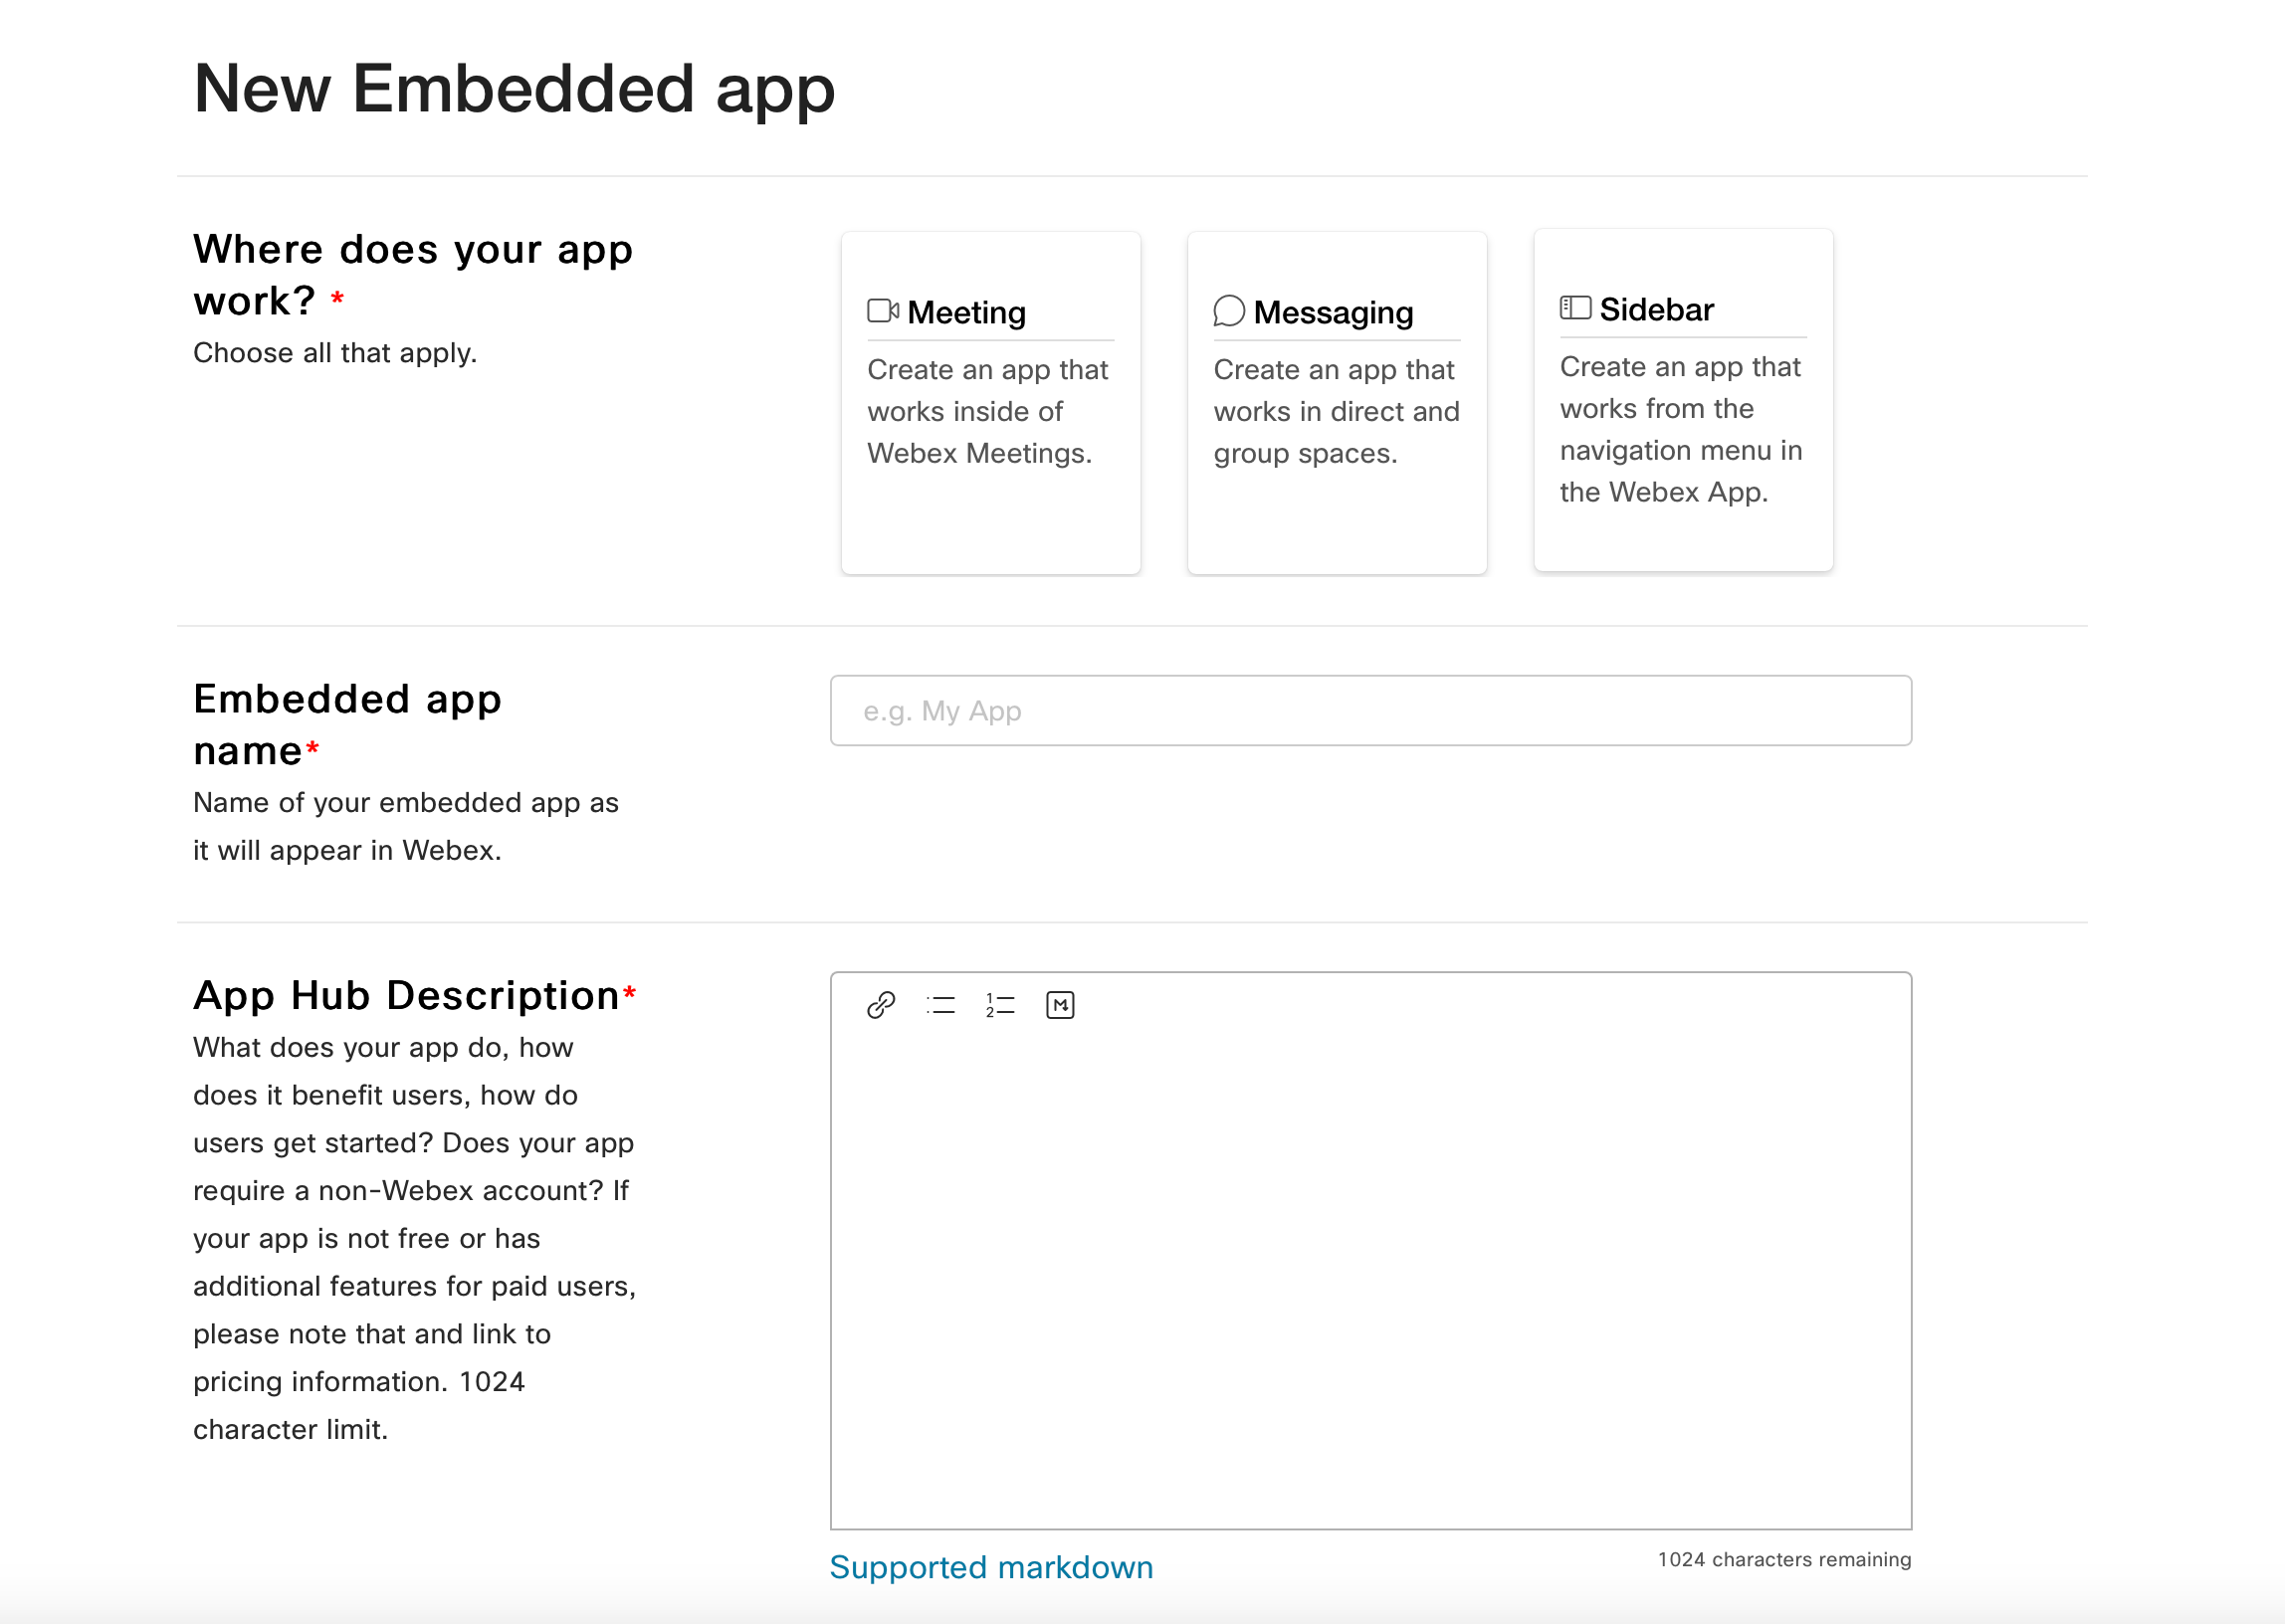
Select or enter values for the embedded app's configuration options.
Click Add Embedded App.
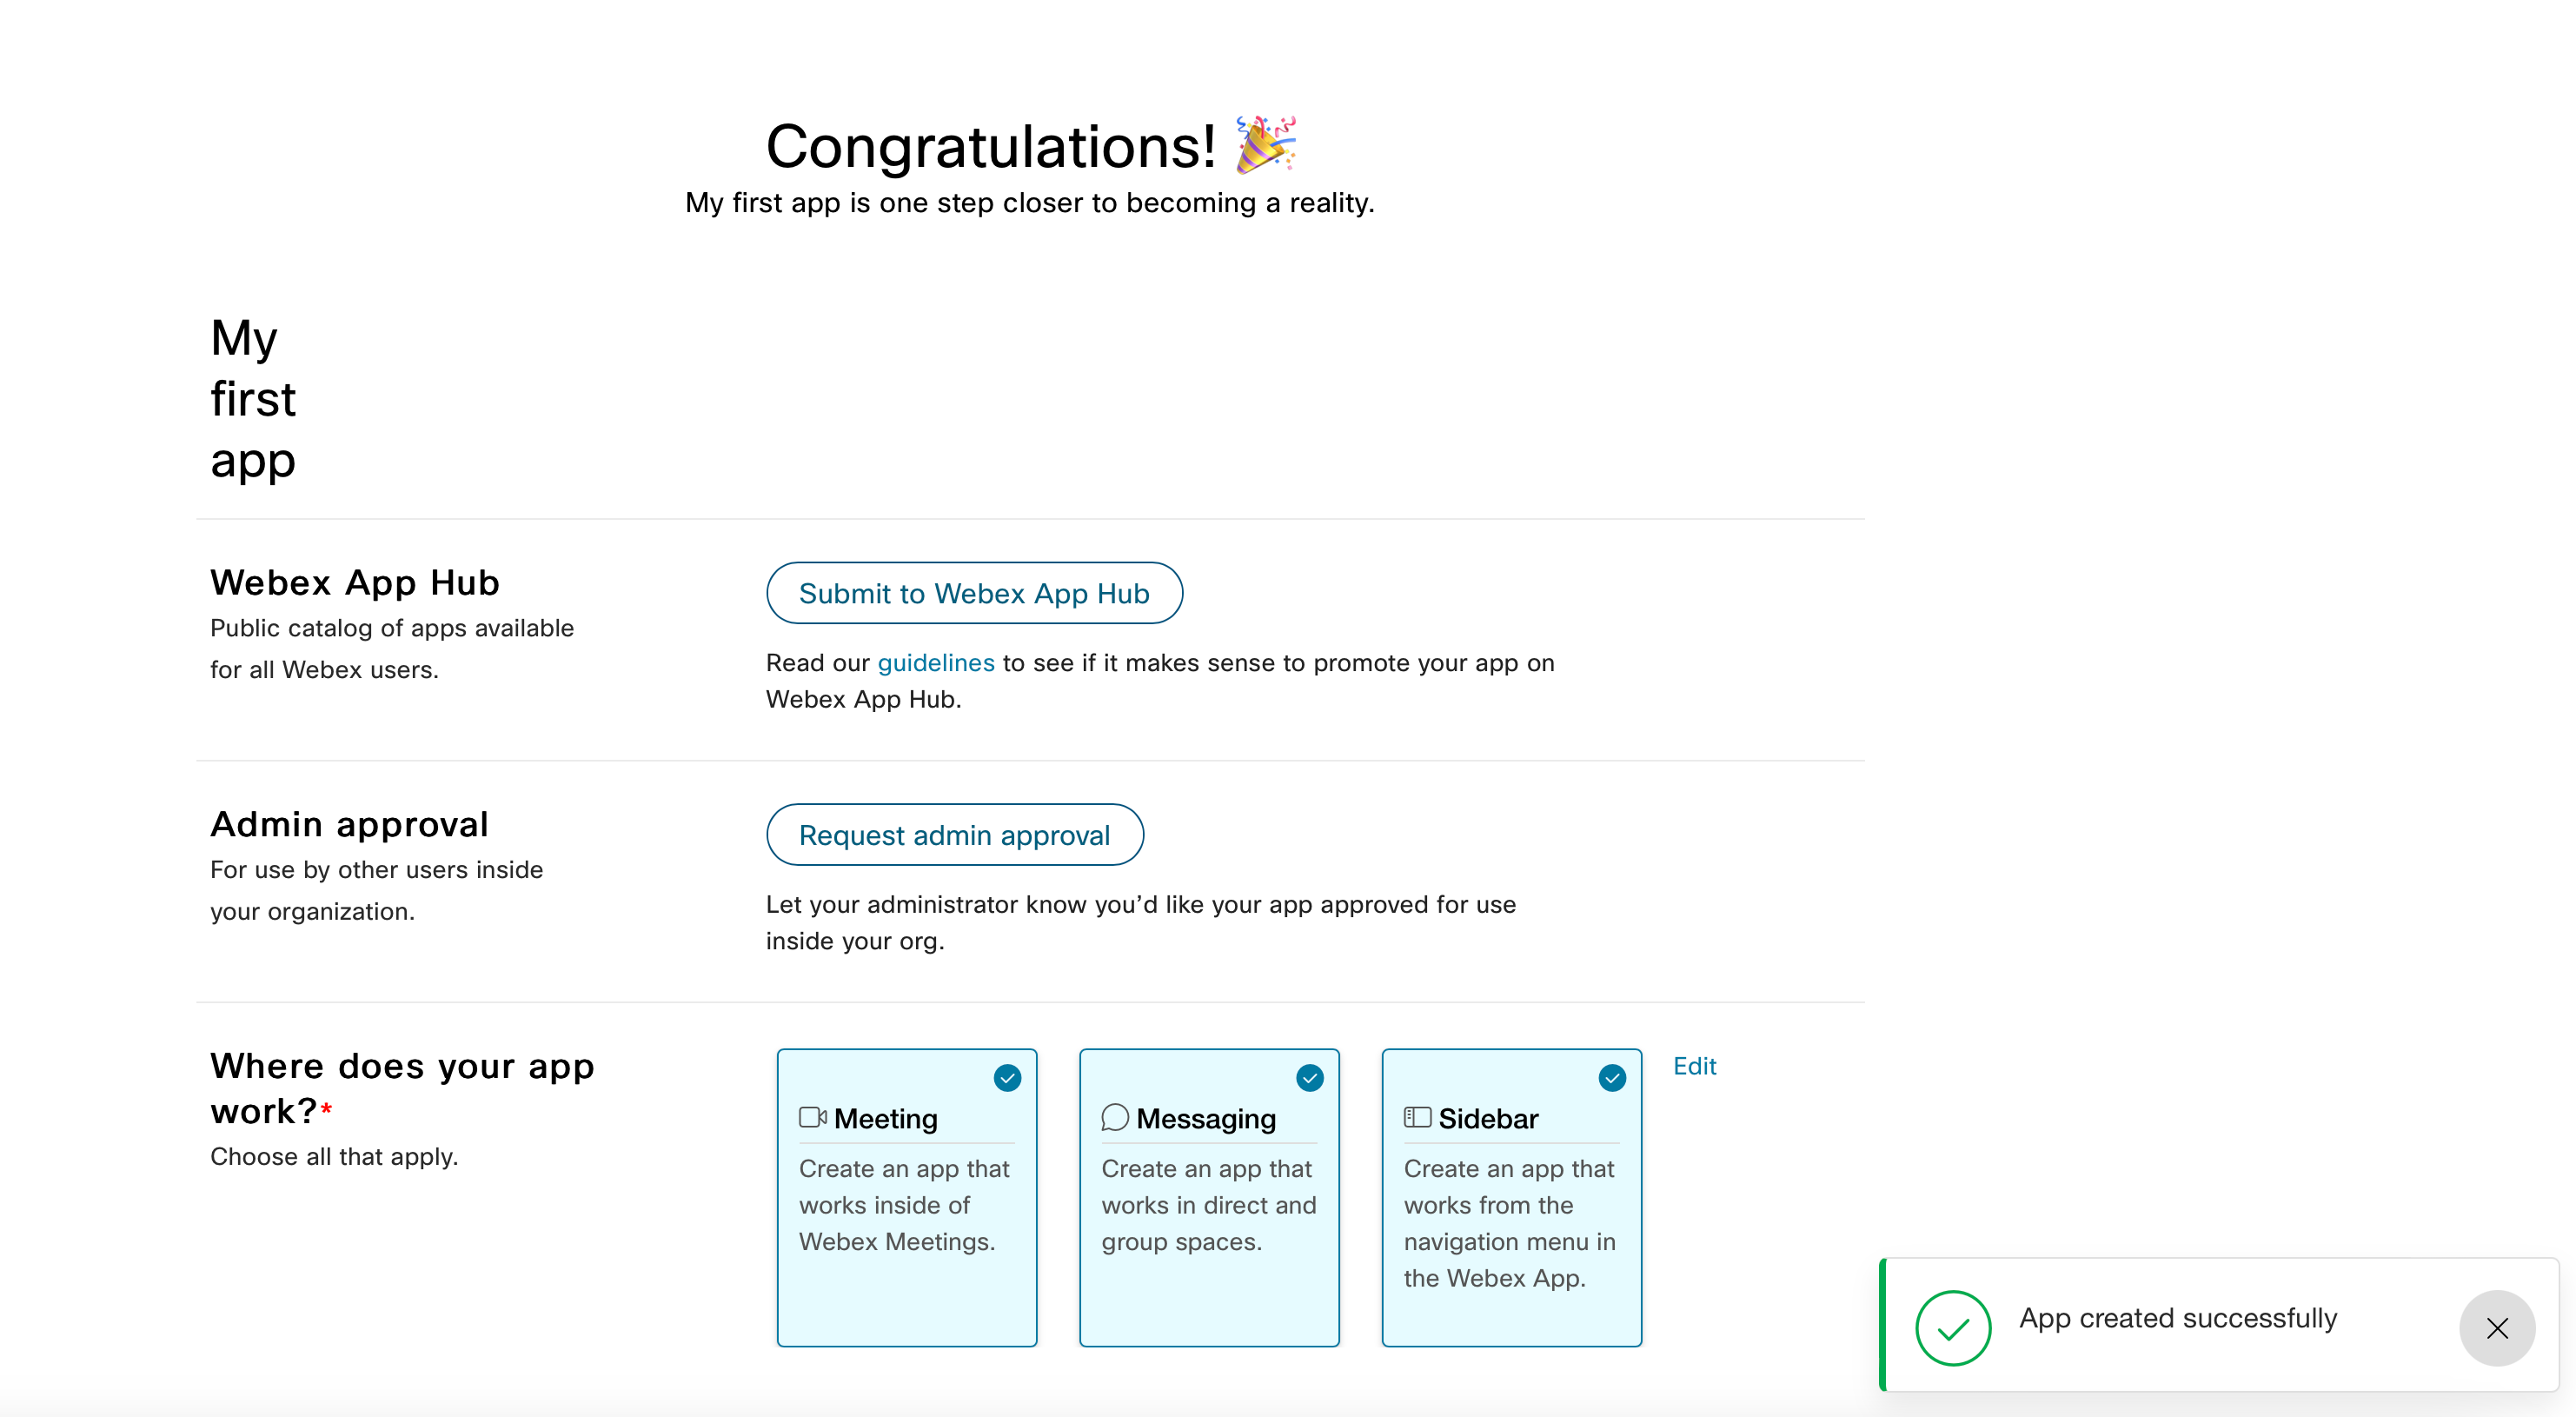
At this point your application is in development mode and is available for your personal use in Webex meetings, messaging spaces or Sidebar. You can request approval of the application so others in your organization can also use it.
anchorEmbedded App Configuration Options
anchorThe following lists and describes the fields available when creating or editing an embedded app in the Embedded App submit form.
Where does your app work? — Specifies whether your app works inside of Webex Meetings, Messaging spaces (direct or group), in the Webex Sidebar or inside all 3 contexts.
Embedded app name — Name of the app as it appears in its App Hub listing, the Apps Gallery, and while running in the Webex app or Meeting Client.
Description — Long-form description (1024 characters maximum) of your application that should explain what your embedded app does, how it benefits users and, most importantly, how a user can get started using it. The field supports Markdown-formatted links, and ordered unordered lists, as shown below.
    [Link text](http://www.example.com/)

    Features:
    * Unordered lists can use asterisks
    1. Numbered lists
Summary — A shorter version of your app's Description field that appears on the app's listing page in App Hub (256 character maximum).
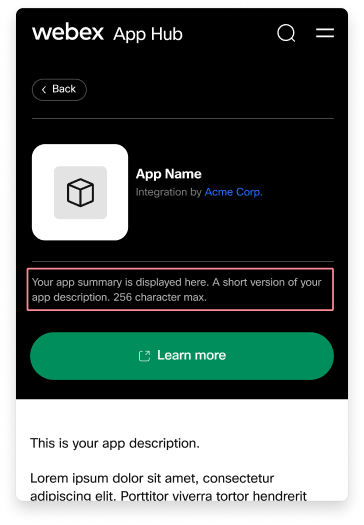
Tagline — Taglines give Webex users a very short and catchy idea of what your app is about and appears below your app’s name in the Apps Gallery (24 character maximum).

The Tagline field does not appear when creating your app, only when editing an existing app.
Icon — Icon displayed in the app's App Hub listing, the Apps Gallery, and the app's title bar.
Valid domains — List of valid domains you will use as the start URL(s) for your embedded app, or as URLs shared with others by call to setShareUrl().
Start Page URL — The URL that opens when a user opens your app from the Apps Gallery. This URL must be available over a secure (HTTPS) connection. You can also override this URL with specific URLs per context (see below).
The following options are available to meeting-based apps:
In-meeting start page URL — You can optionally override the URL specified by Start Page URL with a unique start page URL for meeting-based apps. If not specified then Start Page URL will be used.
Layout preference — Lets you specify if content you share with meeting participants via Open for all opens in the side panel (the default) or in the main meeting view.

The following options are available to messaging-based apps:
Space start page URL — You can optionally override the URL specified by Start Page URL with a unique start page URL for messaging-based apps. If not specified then Start Page URL will be used.
The following options are available to Sidebar-based apps:
Sidebar start page URL — You can optionally override the URL specified by Start Page URL with a unique start page URL for Sidebar-based apps. If not specified then Start Page URL will be used.
Sidebar behavior — Check-box to indicate if the app can be configured to be always ON or not. Always ON apps are launched when the Webex app is launched and are beneficial for use cases where the app need to listen to events all the time. May also require enabling PII (Personally Identifiable Information) in case events have personal information.
anchorPersonally Identifiable Information (PII) and Embedded Apps
anchorThe Embedded App framework provides APIs that may return personally identifiable information (PII) about its users, but only if permitted by the Webex organization’s administrator. Access to a user's personal data for a given app is determined by the PII Restrictions setting specified in Control Hub by the administrator of the user's Webex organization.
- PII Data Provided by the Embedded Apps SDK
- Determining if Personal Data is Available
- In-Development Apps and PII
- About Derived Values
- About the JSON Web Token (JWT)
- Verifying a JWT
- JWT field reference
Personally Identifiable Information Returned by the SDK
The following data fields may contain personally identifiable information (PII) if access to PII has been granted to the app by the organization administrator (see Determining if Personal Data is Available).
User data returned by app.context.getUser():
- User ID (
user.id) - User Email (
user.email) - User Display name (
user.displayName) - User Organization ID (
user.orgId)
- User ID (
Meeting data returned by app.context.getMeeting():
- Meeting Conference ID (
meeting.conferenceId) - Meeting ID (
meeting.id) - Meeting Title (
meeting.title)
- Meeting Conference ID (
Messaging space data returned by app.context.getSpace():
- Space ID (
space.id) - Space Title (
meeting.title)
- Space ID (
In addition, the JSON Web Token (JWT) included in the response to getUser() contains the following additional PII:
- Conference ID (
com.cisco.context.uuid.conferenceid)
Determining if Personal Data is Available
An embedded app can determine if it has access to the given user's personal data by checking the value of app.isPrivateDataAvailable. If this property is true then data returned by API calls such as app.context.getUser() will contain real values; if false, data returned by the SDK will contain either empty strings or "derived" values. Derived values are opaque to third-parties but are guaranteed to be consistent for a given user from a given Webex organization. See About Derived PII Values for more information.
If an app is being shared among users from multiple Webex organizations, app.isPrivateDataAvailable will be true for those users from organizations that have approved access to personal data for that app, and false for users from organizations that have not. In this case, embedded app APIs will return actual data for some users and derived data for others.
For apps that haven't yet been approved for use by an organization administrator, individual app users determine if they want to share their personal data. See In-Development (Private) Apps and Personal Data for more information.
In-Development Apps and PII
By default, embedded apps appear in the Apps Gallery only for the user who created the app in the Developer Portal. These apps are referred to as being "in-development". To make an in-development app available to all users within an organization an administrator must approve the app in Webex Control Hub.
If an unapproved app is shared by the app creator with other users via the Open for all or Add to Space functionality, users are asked before they can open the shared content if they want to share their personally identifiable information with the app or not, as shown below.

In this case the value of app.isPrivateDataAvailable will be determined by which option the user selected before opening the app.
About Derived PII Values
If an organization has disabled access to personally identifying information for a given application (i.e. if app.isPrivateDataAvailable is false) then any fields that would normally contain PII will either contain empty strings or "derived" values. Derived values are opaque to third-parties but are guaranteed to be consistent for a given user from a given organization. This allows apps to uniquely identify their users even if they don't have access to PII.
For example, the following shows an example User object returned by app.context.getUser() when access app.isPrivateDataAvailable is true.
{
    "id": "c9d03fc2-a5e4-452f-bed1-aa1ede630666",
    "orgId": "38adfc99-2313-402c-a913-d68a6536f7df",
    "email": "user@example.com",
    "displayName": "Joe User",
    "token": "<encoded_JWT>"
}
The following is an example User object when app.isPrivateDataAvailable is false for a user of the same app. In this case the email and displayName fields are empty, while id and orgId contain derived UUIDs instead of real values.
{
    "id": "833c49ff-9a88-4c2c-af13-6fc30cb2223a",
    "orgId": "c4baee52-d3ba-4329-ac44-40bac96853c5",
    "email": "",
    "displayName": "",
    "token": "<encoded_JWT>"
}
If a meeting or space has a mix of participants – some with access to PII enabled and some who do not – there will be two different IDs. Users with PII enabled will have the real meeting (or space) ID in the meeting.id or space.id field, while users without PII enabled will have derived IDs for those fields.
About the JSON Web Token (JWT)
The User object returned by app.context.getUser() contains a field named token whose value is a Base64-encoded JSON structure, called a JSON Web Token, or JWT.
{
    "id": "...",
    "orgId": "...",
    "email": "...",
    "displayName": "...",
    "token": "eyJhbGciOiJSUzI1NiJ9..."
}
The purpose of the JWT in the context of embedded apps is two-fold:
- Provide a way for embedded apps to verify the integrity of the data they are provided by the framework. See Verifying the JWT for details.
- Expose additional data fields to apps beyond what are available as top-level API properties. See JWT field reference for a list of all data fields contained by the JWT.
The JWT is not an access token for calling Webex APIs on behalf of the user of your application. Your applications will need to obtain an access token following the standard integration workflows.
Verifying the JWT
To verify the authenticity of the JWT token returned by getUser() you need to obtain the verification key at a URL provided by Webex. To obtain this URL you concatenate the base URL contained by the iss (issuer) field in the decoded JWT with the string /oauth2/v2/keys/verification. The verification key is contained by the new_verification_key field of the JSON object returned at this URL.
For example, the following shows a decoded JWT whose iss field contains the URL https://idbroker-b-us.webex.com/idb.
{
  "email_verified": false,
  "iss": "https://idbroker-b-us.webex.com/idb",
  ...
}
Therefore, the full URL to obtain the verification key in this scenario would be https://idbroker-b-us.webex.com/idb/oauth2/v2/keys/verification. Below is an example JSON object containing the new_verification_key field returned by the full verification URL:
{
    key_valid_time: 21600,
    new_verification_key: "MIIBIjANBgk..."
}
To avoid any potential "man-in-the-middle" security threat, developers are encouraged to verify that the base URL specified by the iss field contains the webex.com domain before using it to verify the JWT.
JWT field reference
The section lists the fields of the JWT returned in response to a call to app.context.getUser(). Some of these fields are also available on the User object returned by getUser(), such as user.id or user.email. Others are only available as JWT fields, such as given_name.
The following are registered claim names included in the JWT:
exp– Number. Life span of token in seconds.iat– Number. The time the token was issued.iss– String. URI of the principal that issued the claims contained by the token (https://idbroker.webex.com/idb, for example)aud– String. ID of embedded application.name– String. User’s display name. Empty if access to PII has been disabled by the user's organization.given_name– String. User’s first name. Empty if access to PII has been disabled by the user's organization.family_name– String. User’s last name. Empty if access to PII has been disabled by the user's organization.email– String. User's email. Empty if access to PII has been disabled by the user's organization.email_verified– Boolean. If "true" indicates that the email was verified by Cisco and the user's PII is shared in the token. If "false", indicates that the user's email was not verified by Cisco and derived values are used for PII.
The following are Cisco claim names included in the JWT:
com.cisco.user.orgid– String. User's organization ID. Contains a derived value if access to PII is disabled for the app by the organization administrator.com.cisco.user.uuid– String. User ID. Contains a derived value if access to PII is disabled for the app by the organization administrator.com.cisco.user.level– Array. Contains one or more of the following values:- "admin"
- "guest"
- "basic"
- "enhanced"
com.cisco.context.uuid.conferenceid– String. Conference ID. Contains a derived value if access to PII is disabled for the app by the organization administrator.com.cisco.context.uuid.conferenceid.derived – String. Derived conference ID. If access to PII is disabled for the app by the organization administrator this will match the value of com.cisco.context.uuid.conferenceid.com.cisco.context.uuid.meetingid– String. Meeting ID. Contains a derived value if access to PII is disabled for the app by the organization administrator.com.cisco.context.uuid.meetingid.derived– String. Derived meeting ID. If access to PII is disabled for the app by the organization administrator this will match the value ofcom.cisco.context.uuid.meetingid.com.cisco.context.uuid.spaceid– String. Space ID. Contains a derived value if access to PII is disabled for the app by the organization administrator.com.cisco.context.uuid.spaceid.derived– String. Derived space ID. If access to PII is disabled for the app by the organization administrator this will match the value of com.cisco.context.uuid.spaceid.com.cisco.user.info– JSON blob containing additional information about the user, meeting, or space.
Below is an example JWT returned by a call to app.context.getUser(), using abbreviated UUIDs for clarity. In this case, email_verified is false which indicates that derived or empty values are returned in place of PII (see About Derived PII Values for details on when derived or empty values are returned).
{
  "email_verified": false,
  "iss": "https://idbroker-b-us.webex.com/idb",
  "com.cisco.context.uuid.meetingid.derived": "a9b68195-...",
  "com.cisco.user.uuid": "bbd582d2-...",
  "com.cisco.context.uuid.meetingid": "a9b68195-...",
  "com.cisco.context.uuid.conferenceid": "55c205d8-...",
  "given_name": "",
  "aud": "Y2lzY29z...",
  "com.cisco.user.orgid": "86434df5-...",
  "com.cisco.context.uuid.conferenceid.derived": "55c205d8-...",
  "name": "",
  "com.cisco.user.level": [
    "enhanced",
    "admin"
  ],
  "exp": 1634679561,
  "iat": 1634593161,
  "family_name": "",
  "email": "",
  "com.cisco.user.info": "{\"some_property_name\":\"Some data.\"}"
}
anchorResponding to Events
anchorThe framework emits events in response to changes to the meeting, space, or application (Webex or Meeting Center client) in which an embedded app is running. Embedded apps can create event listeners to respond to these events, as needed. The following events are currently generated by the framework. The event object passed to your app's event listener contains details about the event.
application:shareStateChanged— Fired when an embedded app starts or stops a sharing session.application:displayContextChanged— Fired when the app's rendering context changes, such as when a user pops out the app from the sidebar into its own window.application:themeChanged— Fired when the user changes the color theme in the Meeting Center or Webex client.meeting:infoChanged— Fired when information has changed for the meeting in which the embedded app is running.meeting:roleChanged— Fired when the role for the current participant changes, such as from host to participant or vice-versa.space:infoChanged— Fired when changes are made to information about the current space, such as the space's title.
Creating Event Listeners
The basic pattern for creating event listeners is shown below, where app is a Webex.Application instance previously created:
app.listen().then(function() {
  // listen().then() ok
   app.on(<eventName1>, <callback>);
   app.on(<eventName2>, <callback>);
})
.catch(function (reason) {
  // listen().then() failed
});
Or, with JavaScript arrow functions:
app.listen().then(() => {
   app.on(<eventName1>, <callback>);
   app.on(<eventName2>, <callback>);
})
.catch(function (reason) {
  // Listen() promise failed
});
When the listen() promise resolves successfully it indicates that the framework is ready to register your application's callback functions. For example, the following creates listeners for both meeting.infoChanged and application.themeChanged.
app
  .listen()
  .then(() => {
      app.on("meeting.infoChanged", (event) => {
          let meetingId = event.id;
          let conferenceId = event.conferenceId
          // etc..
      })
      app.on("application:themeChanged", (event) => {
        // Call custom function to update theme:
        // updateAppTheme(event);
      })
  })
  .catch(function (reason) {
      console.error("listen: fail reason=" + reason);
  });
Responding to Color Theme Changes
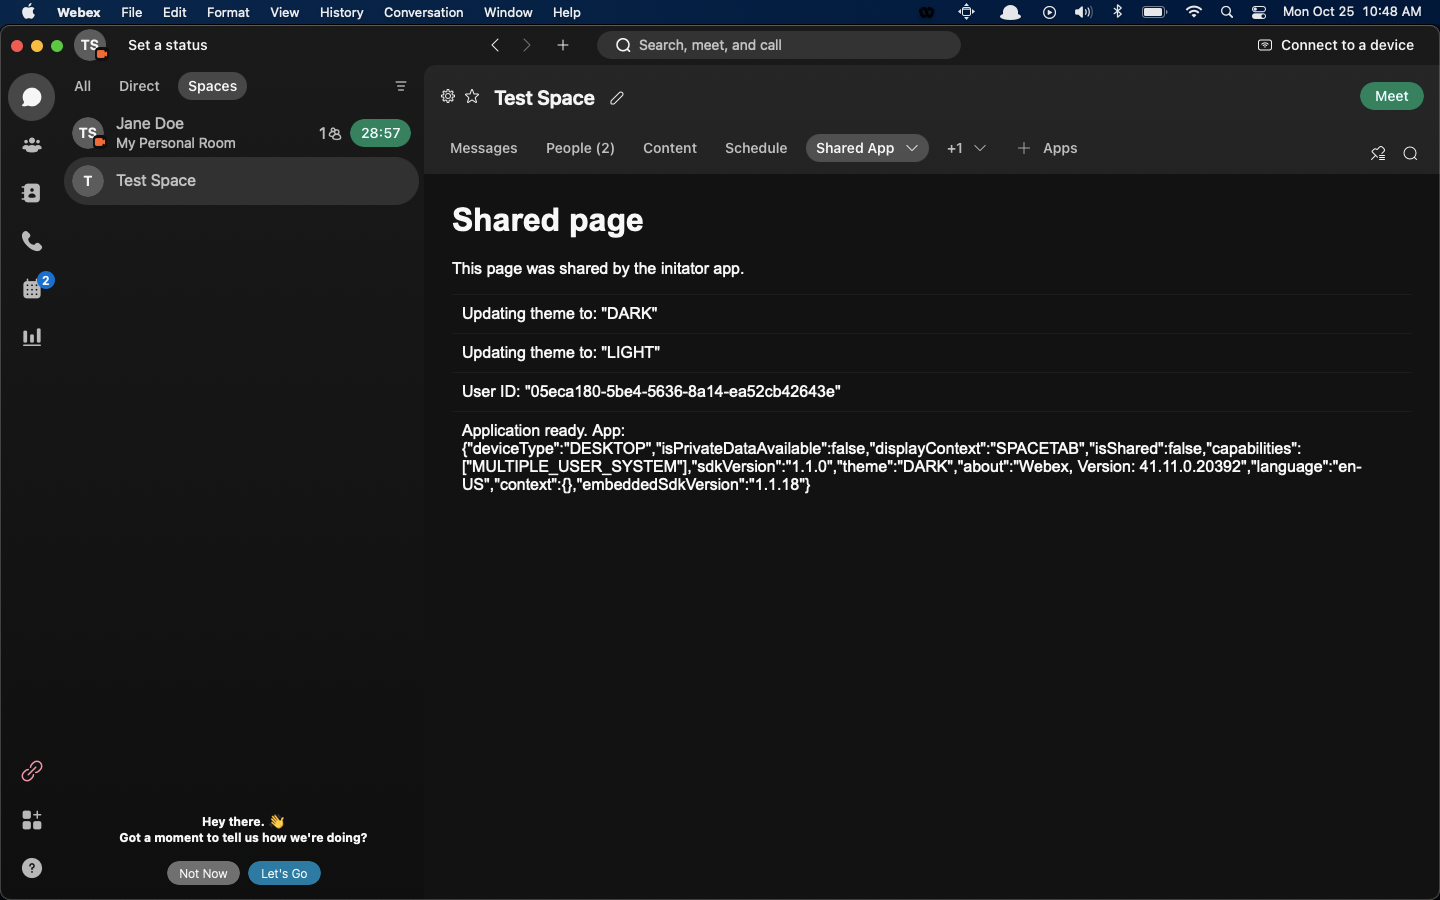
In the screenshot of the Open for all session shown previously you'll notice that the host and participant had different themes applied to their Meeting Center client. The white background of the shared URL looks good for the host (whose meeting window is set to use the light theme) but not as good for the participant who has selected the dark theme. Ideally, the application theme matches client application's theme.
In this section you'll add code that updates basic CSS styles in the shared application to match the currently selected theme. There are two parts to this:
- Setting color styles to match the theme setting on initial launch. You can get the current theme setting from the app.theme property.
- Responding to theme changes the user makes in Webex or Meeting client, which generates an application:themeChanged event.
To make the app's colors match the selected theme:
Open shared.js from the embedded app you created in the quick start.
Append the following code to the
onReady().then()handler:// Register event handler for themeChanged event: app.on('application:themeChanged', (theme) => { updateColorTheme(theme); log("Updating theme to", theme) }) })When the
application:themeChangedevent is emitted the listener function calls a custom function namedupdateColorTheme(), passing it the event object containing the newly selected theme.Add the
updateColorTheme()function to shared.js:function updateColorTheme(theme) { switch (theme) { case "LIGHT": document.body.style["background"] = "#FFFFFF"; document.body.style["color"] = "#000000"; break; case "DARK": document.body.style["background"] = "#121212"; document.body.style["color"] = "#F7F7F7"; break; default: break; } }Lastly, for the app's colors to match the theme when the application starts, add following code to the app's
onReady()handler.updateColorTheme(app.theme)Your app's
onReady()handler should look like the following:app.onReady().then(() => { log("Application ready. App", app); app.context.getUser().then((user)=> { log("User ID", user.id) }).catch((errorcode) => { log("Error", errorcode) }) // Register event handler for themeChanged event: app.on('application:themeChanged', (theme) => { updateColorTheme(theme); log("Updating theme to", theme) }) // Set app theme to match selected theme on load: updateColorTheme(app.theme) })Publish your changes to shared.js to your web host.
To test these changes:
Open the shared app in a meeting add as a tab to a space. If the shared app is already open in a meeting or space, right-click (or control-click) on any empty area of the shared app's viewport and select Reload.
The app's color theme should match the currently selected theme on initial load.
In Meeting Center select View > Themes and select a different theme, or in a Webex Space open Preferences, click Appearance and select a new theme.
The app's theme changes to match the currently selected theme.
anchorEnabling Developer Tools
anchorTo test and debug your embedded app while it runs in the Webex or Meeting Center client, you can use the standard developer tools available in Chrome and other modern web browsers. You first need to set a system flag or preference on your development system to enable developer tools.
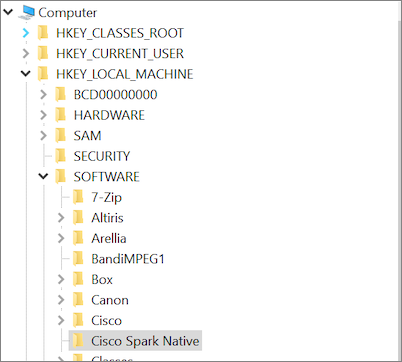
To enable developer tools in Webex for Windows:
Open the Registry Editor application.
Add a new registry key named Cisco Spark Native to Computer\HKEY_LOCAL_MACHINE\SOFTWARE.
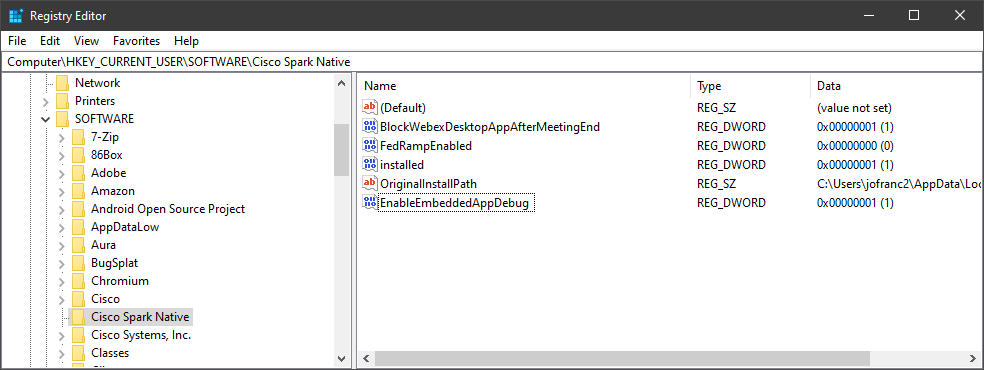
Add a new DWORD (32-bit) value named EnableEmbeddedAppDebug to the Computer\HKEY_LOCAL_MACHINE\SOFTWARE\Cisco Spark Native registry key, and set its value to 1. To disable, set to 0.
To enable developer tools in Webex for MacOS:
Create an empty file named
cisco_spark_enable_webinspector.txtand save it to your Mac's Desktop folder, for example:touch ~/Desktop/cisco_spark_enable_webinspector.txt
To enable developer tools in Meeting Center for Windows and MacOS:
Create a file named
featureToggle.xml.Add the following text:
<featureToggles>
 <feature name="EnableEmbeddedAppsDevMode" isEnabled="1"/>
</featureToggles>
To enable the dev tools, set
isEnabledto1. To disable, set to0.Copy the file to the following location:
Windows:
%USERPROFILE%Mac:
~/Library/Application Support/Webex Meetings/AppData/Restart Webex.
For either platform, to display the dev tools, right click in your embedded app and choose Inspect from the context menu.
Opening Developer Tools
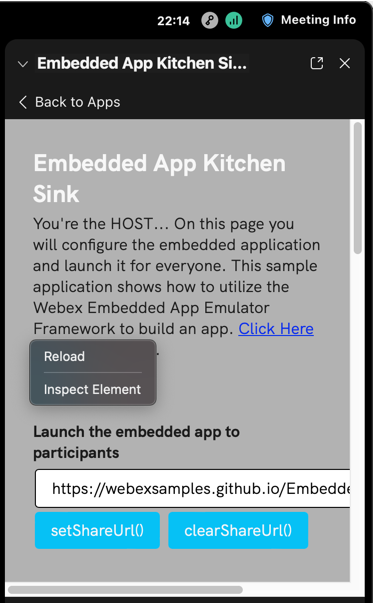
To open the developer tools in Webex or Meeting Center for MacOS, right-click (or Ctrl-click) anywhere inside the app's viewport and select Inspect Element.
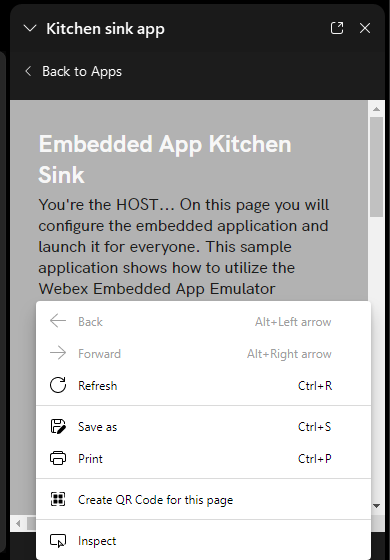
To open the developer tools in Webex or Meeting Center for Windows, right-click (or Ctrl-click) anywhere inside the app's viewport and select Inspect.
anchorSubmitting your App to Webex App Hub
anchorNot supported for Webex for Government (FedRAMP)
You can optionally submit your application to Webex for inclusion on App Hub.
To submit your app to App Hub:
- Open your My Apps page in the Developer Portal.
- Click the app you want to submit.
- Click Submit to Webex App Hub to open the Webex App Hub Submission page.
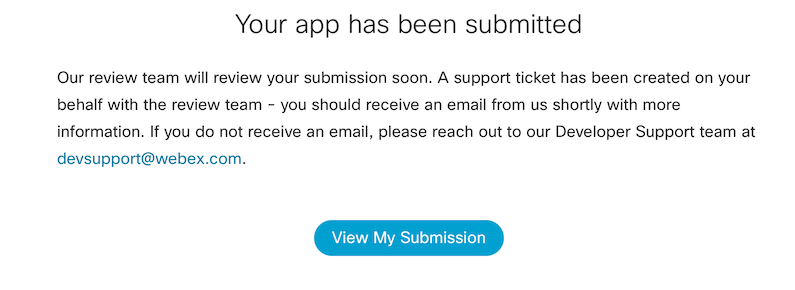
- Provide values for all required fields and click Submit.
anchorDevelopment Tips and Tricks
anchorThis section provides an assortment of solutions to common questions or problems for developing Embedded Apps.
- Checking for an Existing Sharing Session
- Check if App is Running In-Space or In-Meeting
- Using Cookies and Web Storage
- About Combined Embedded App and Integration Solutions
- Clearing the Webex Cache
- Ensuring the Framework is Loaded and Ready
Checking for an Existing Sharing Session
It's good practice to check the value of app.isShared before calling setShareUrl(). This avoids the scenario of the "Open for all" button mistakenly appearing for meeting participants.
For example, in the following code sample the embedded app's handleSetShare() is responsible for calling setShareUrl() in response to some other event. The function first checks the value of app.isShared and exits the function if it's true.
function handleSetShare(url)
    if (app.isShared) {
      log('ERROR: setShareUrl() should not be called while session is active');
      return;
    }
    // Call setShareUrl() as usual...
}
Check if App is Running In-Space or In-Meeting
In some cases an embedded app may need to determine if it's running in a meeting or a space. One way to do this is to check the value of the app.displayContext, which contains one of the following values: "MEETING_SIDEBAR", "MEETING_STANDALONE_WINDOW", "MEETING_MAINVIEW", or "SPACETAB". For example, the following code uses the includes() function to check if app.displayContext contains the string "MEETING". If includes() returns true the app is running in a meeting, otherwise it's running in a space.
    var app = new window.Webex.Application();
    var isMeeting = false;

    app.onReady().then(() => {
        // Check if running in a meeting
        isMeeting = app.displayContext.includes("MEETING");
        if(isMeeting) {
            console.log("I'm running in a meeting");
        } else {
            console.log("I'm running in a space");
        }
    }).catch((errorcode) =>  {
        log("Error: ", Webex.Application.ErrorCodes[errorcode]);
    });
Using Cookies and Web Storage
Embedded apps can use cookies and Web Storage the same way they are used in web browsers. Persistent cookies and local storage data are persisted after a user quits the Webex app or Meeting Center client; session cookies and session storage data are deleted when the user closes Webex or Meeting Center.
About Combined Embedded App and Integration Solutions
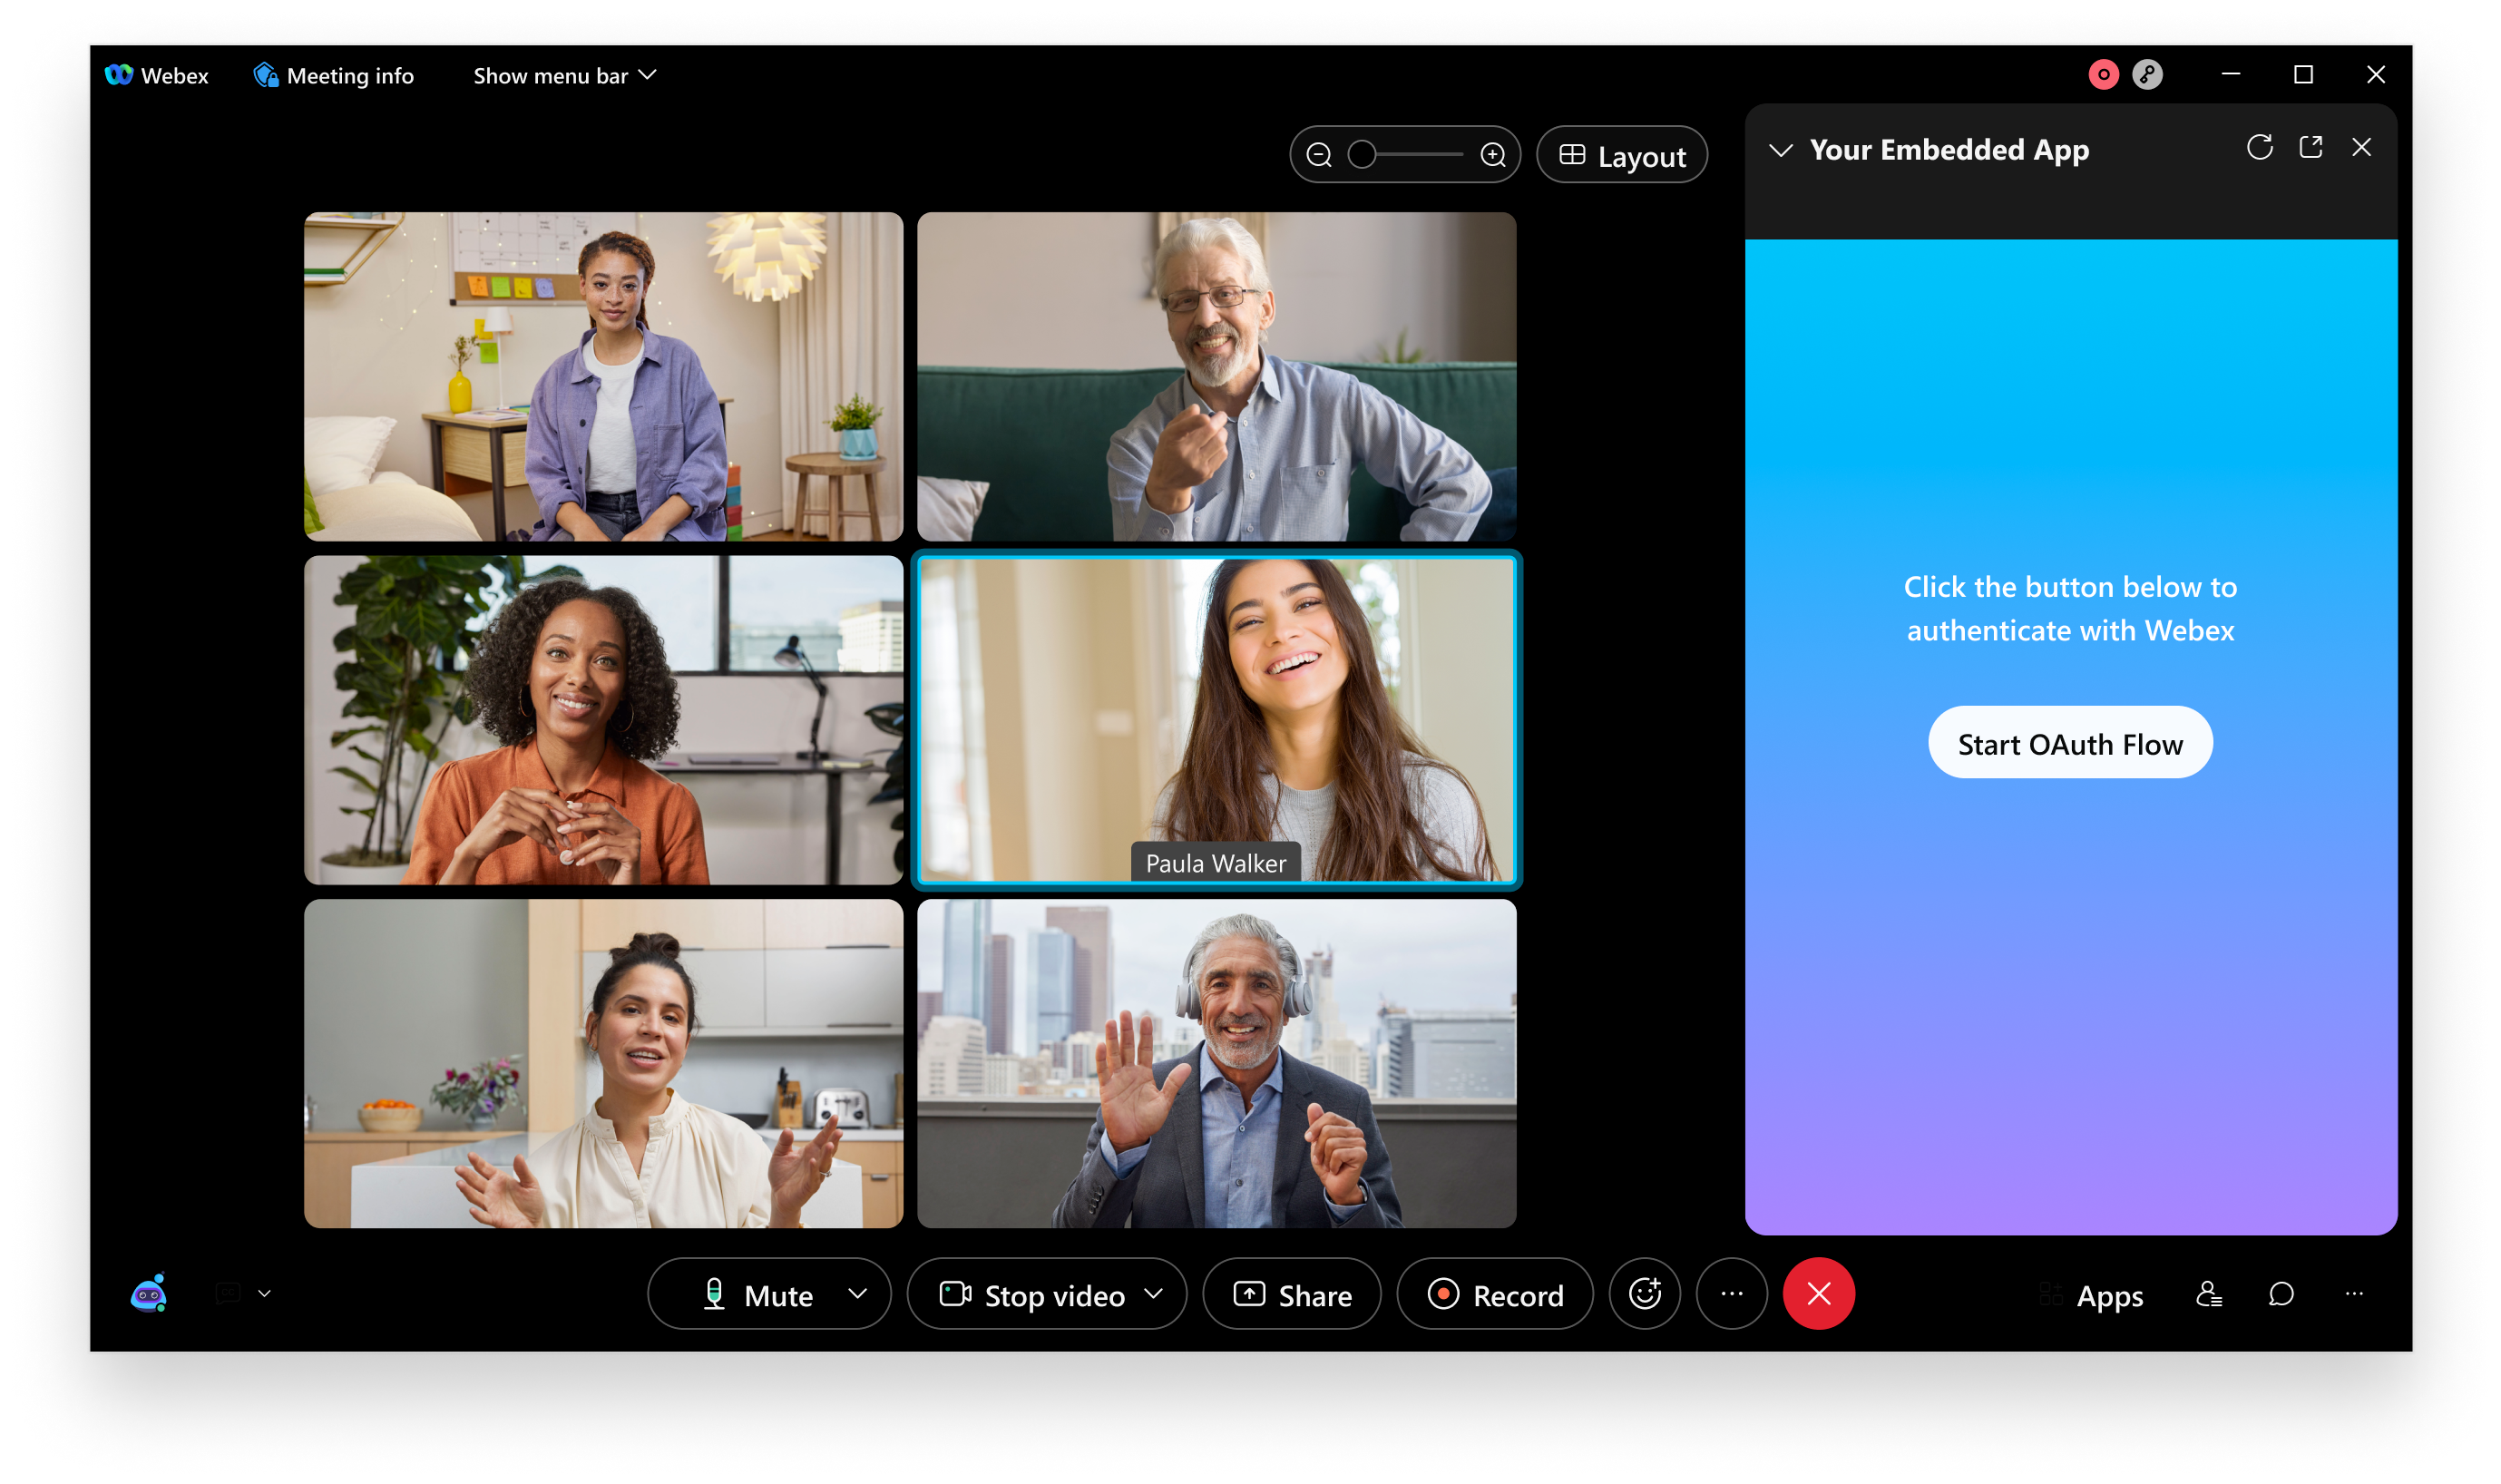
Embedded apps can't make Webex API calls directly. However, your embedded app can be backed by a server process that acts as a Webex Integration. In this scenario, the embedded app prompts the user to initiate the OAuth authorization process to obtain an access token to make Webex API calls on the user's behalf.
First, the user clicks a button or link in the embedded app that opens the Webex authorization request URL(https://webexapis.com/v1/authorize). This URL is configured with your Webex integration's requested scopes, client ID, and redirect URL, and other request parameters.
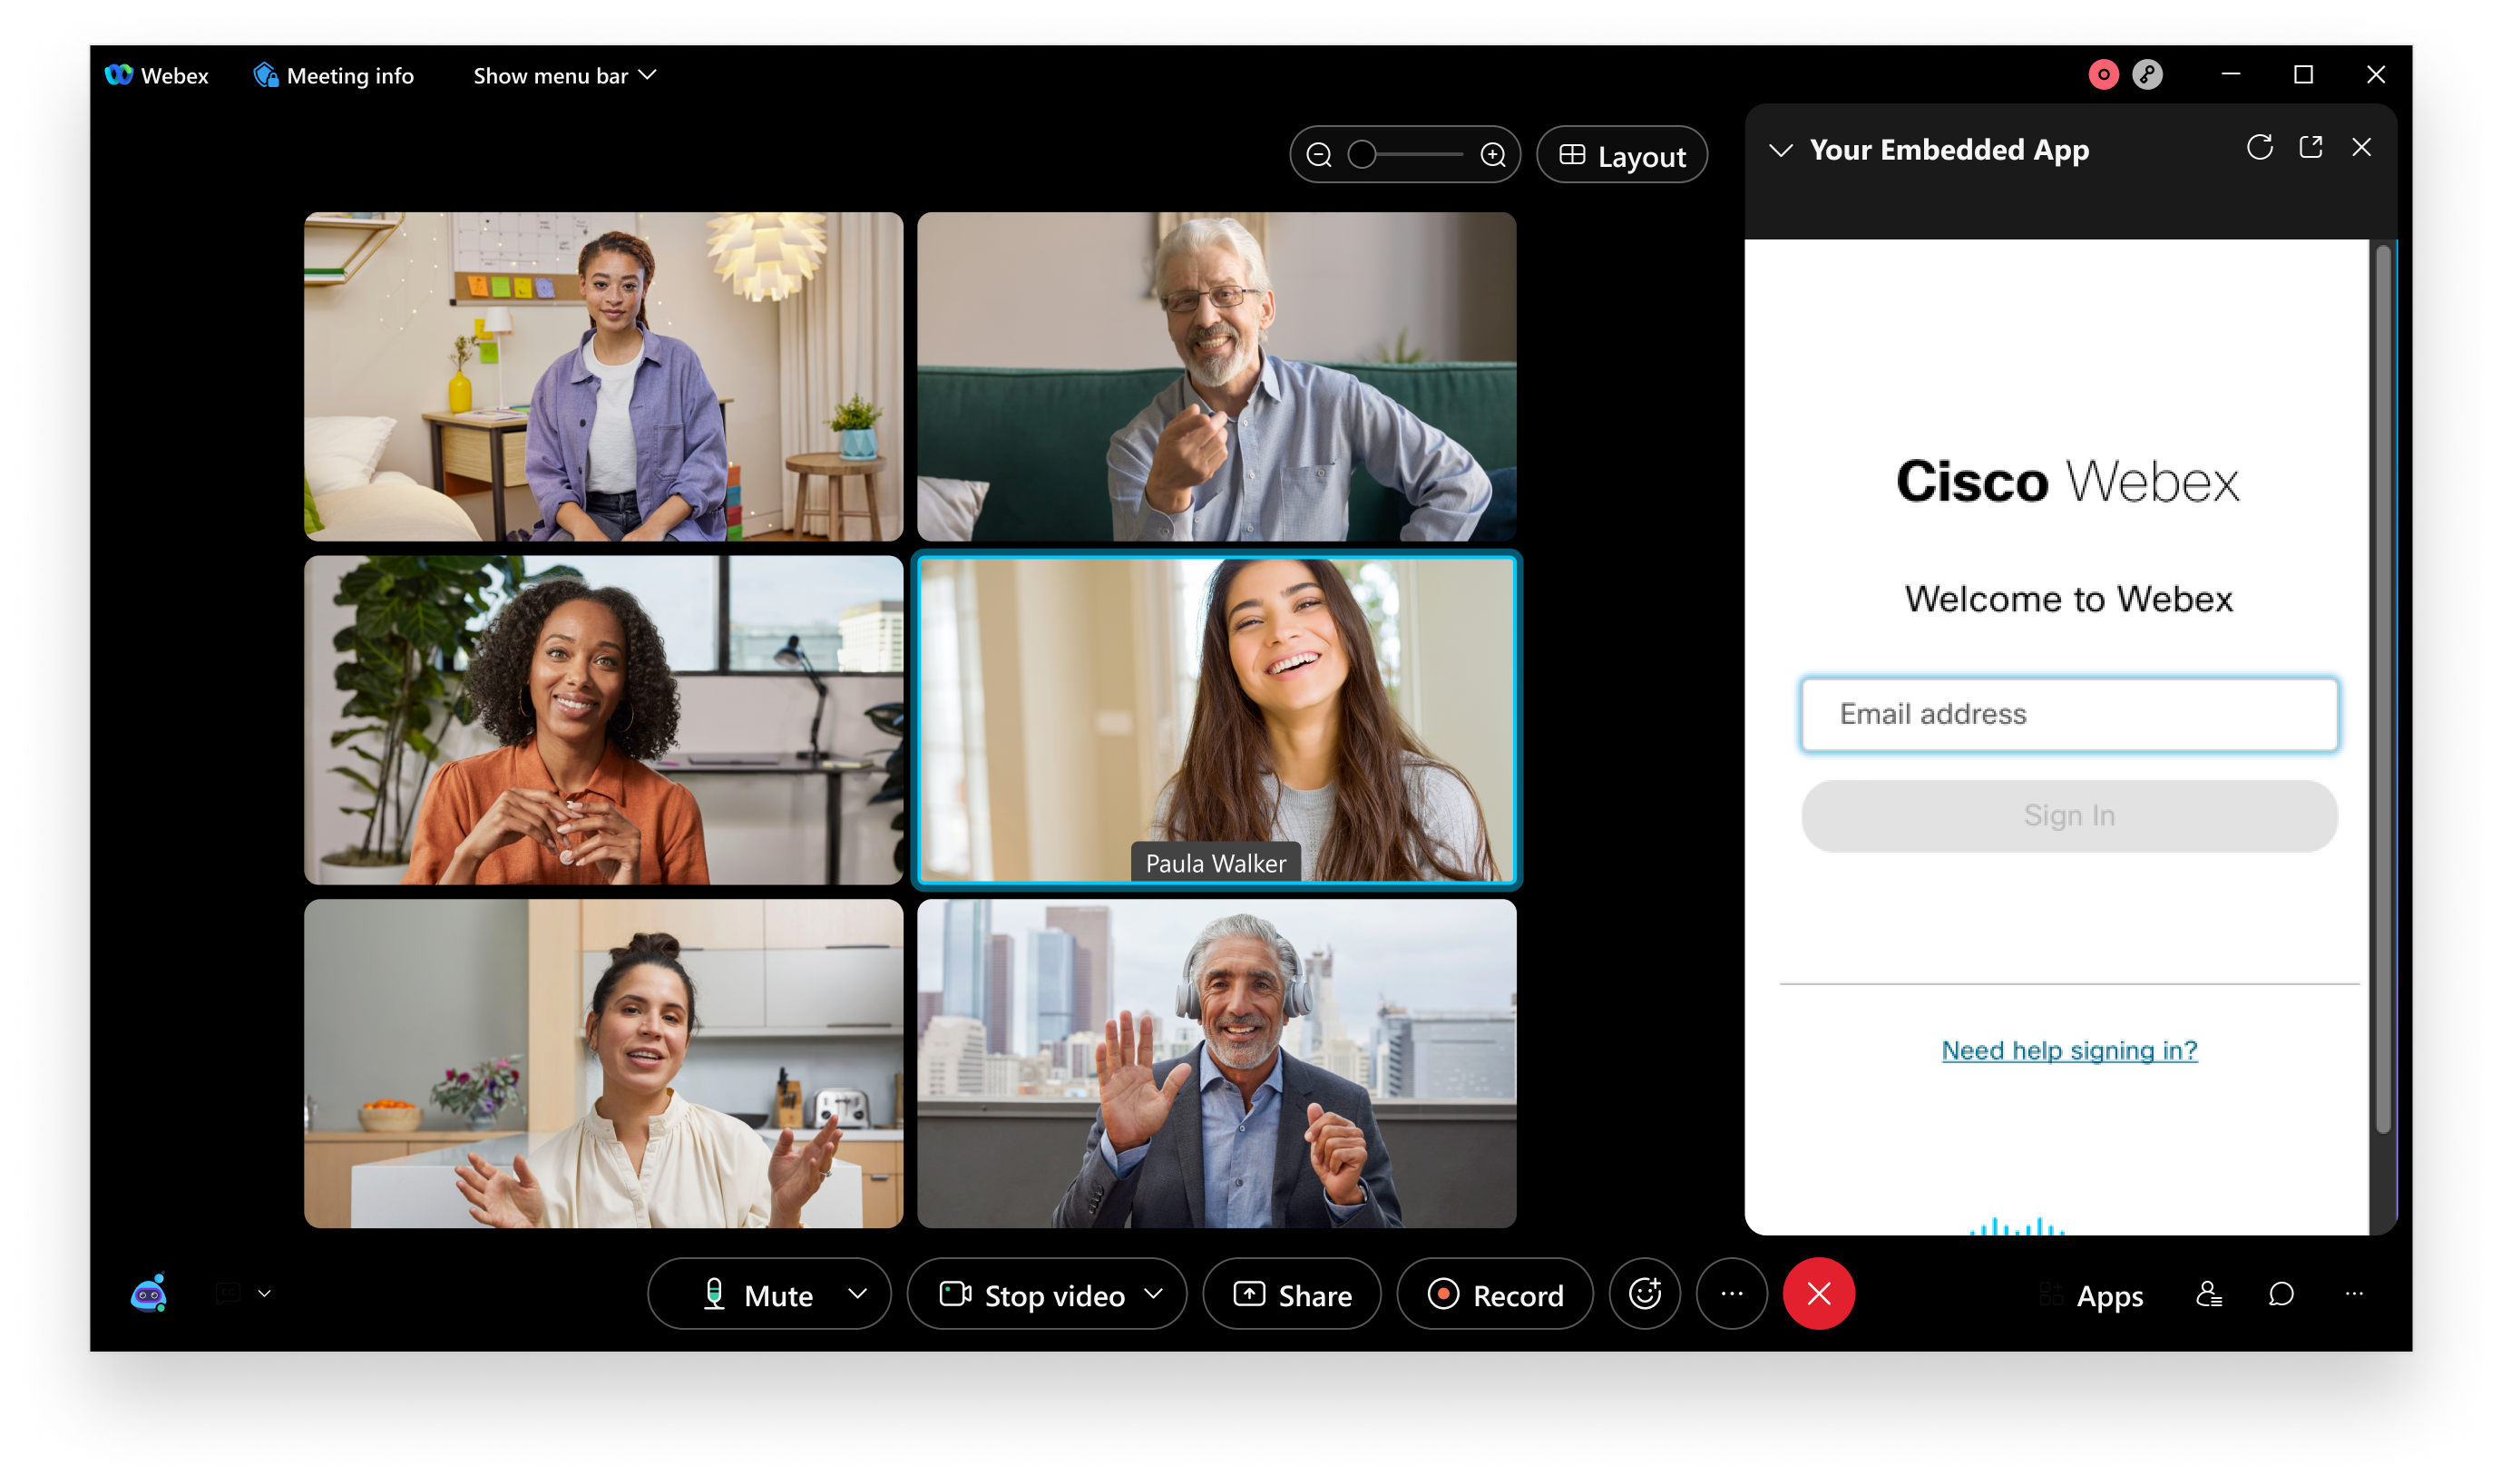
Once the user has signed in to their Webex account they are asked if they want to accept the request for access to data in the specified scopes.
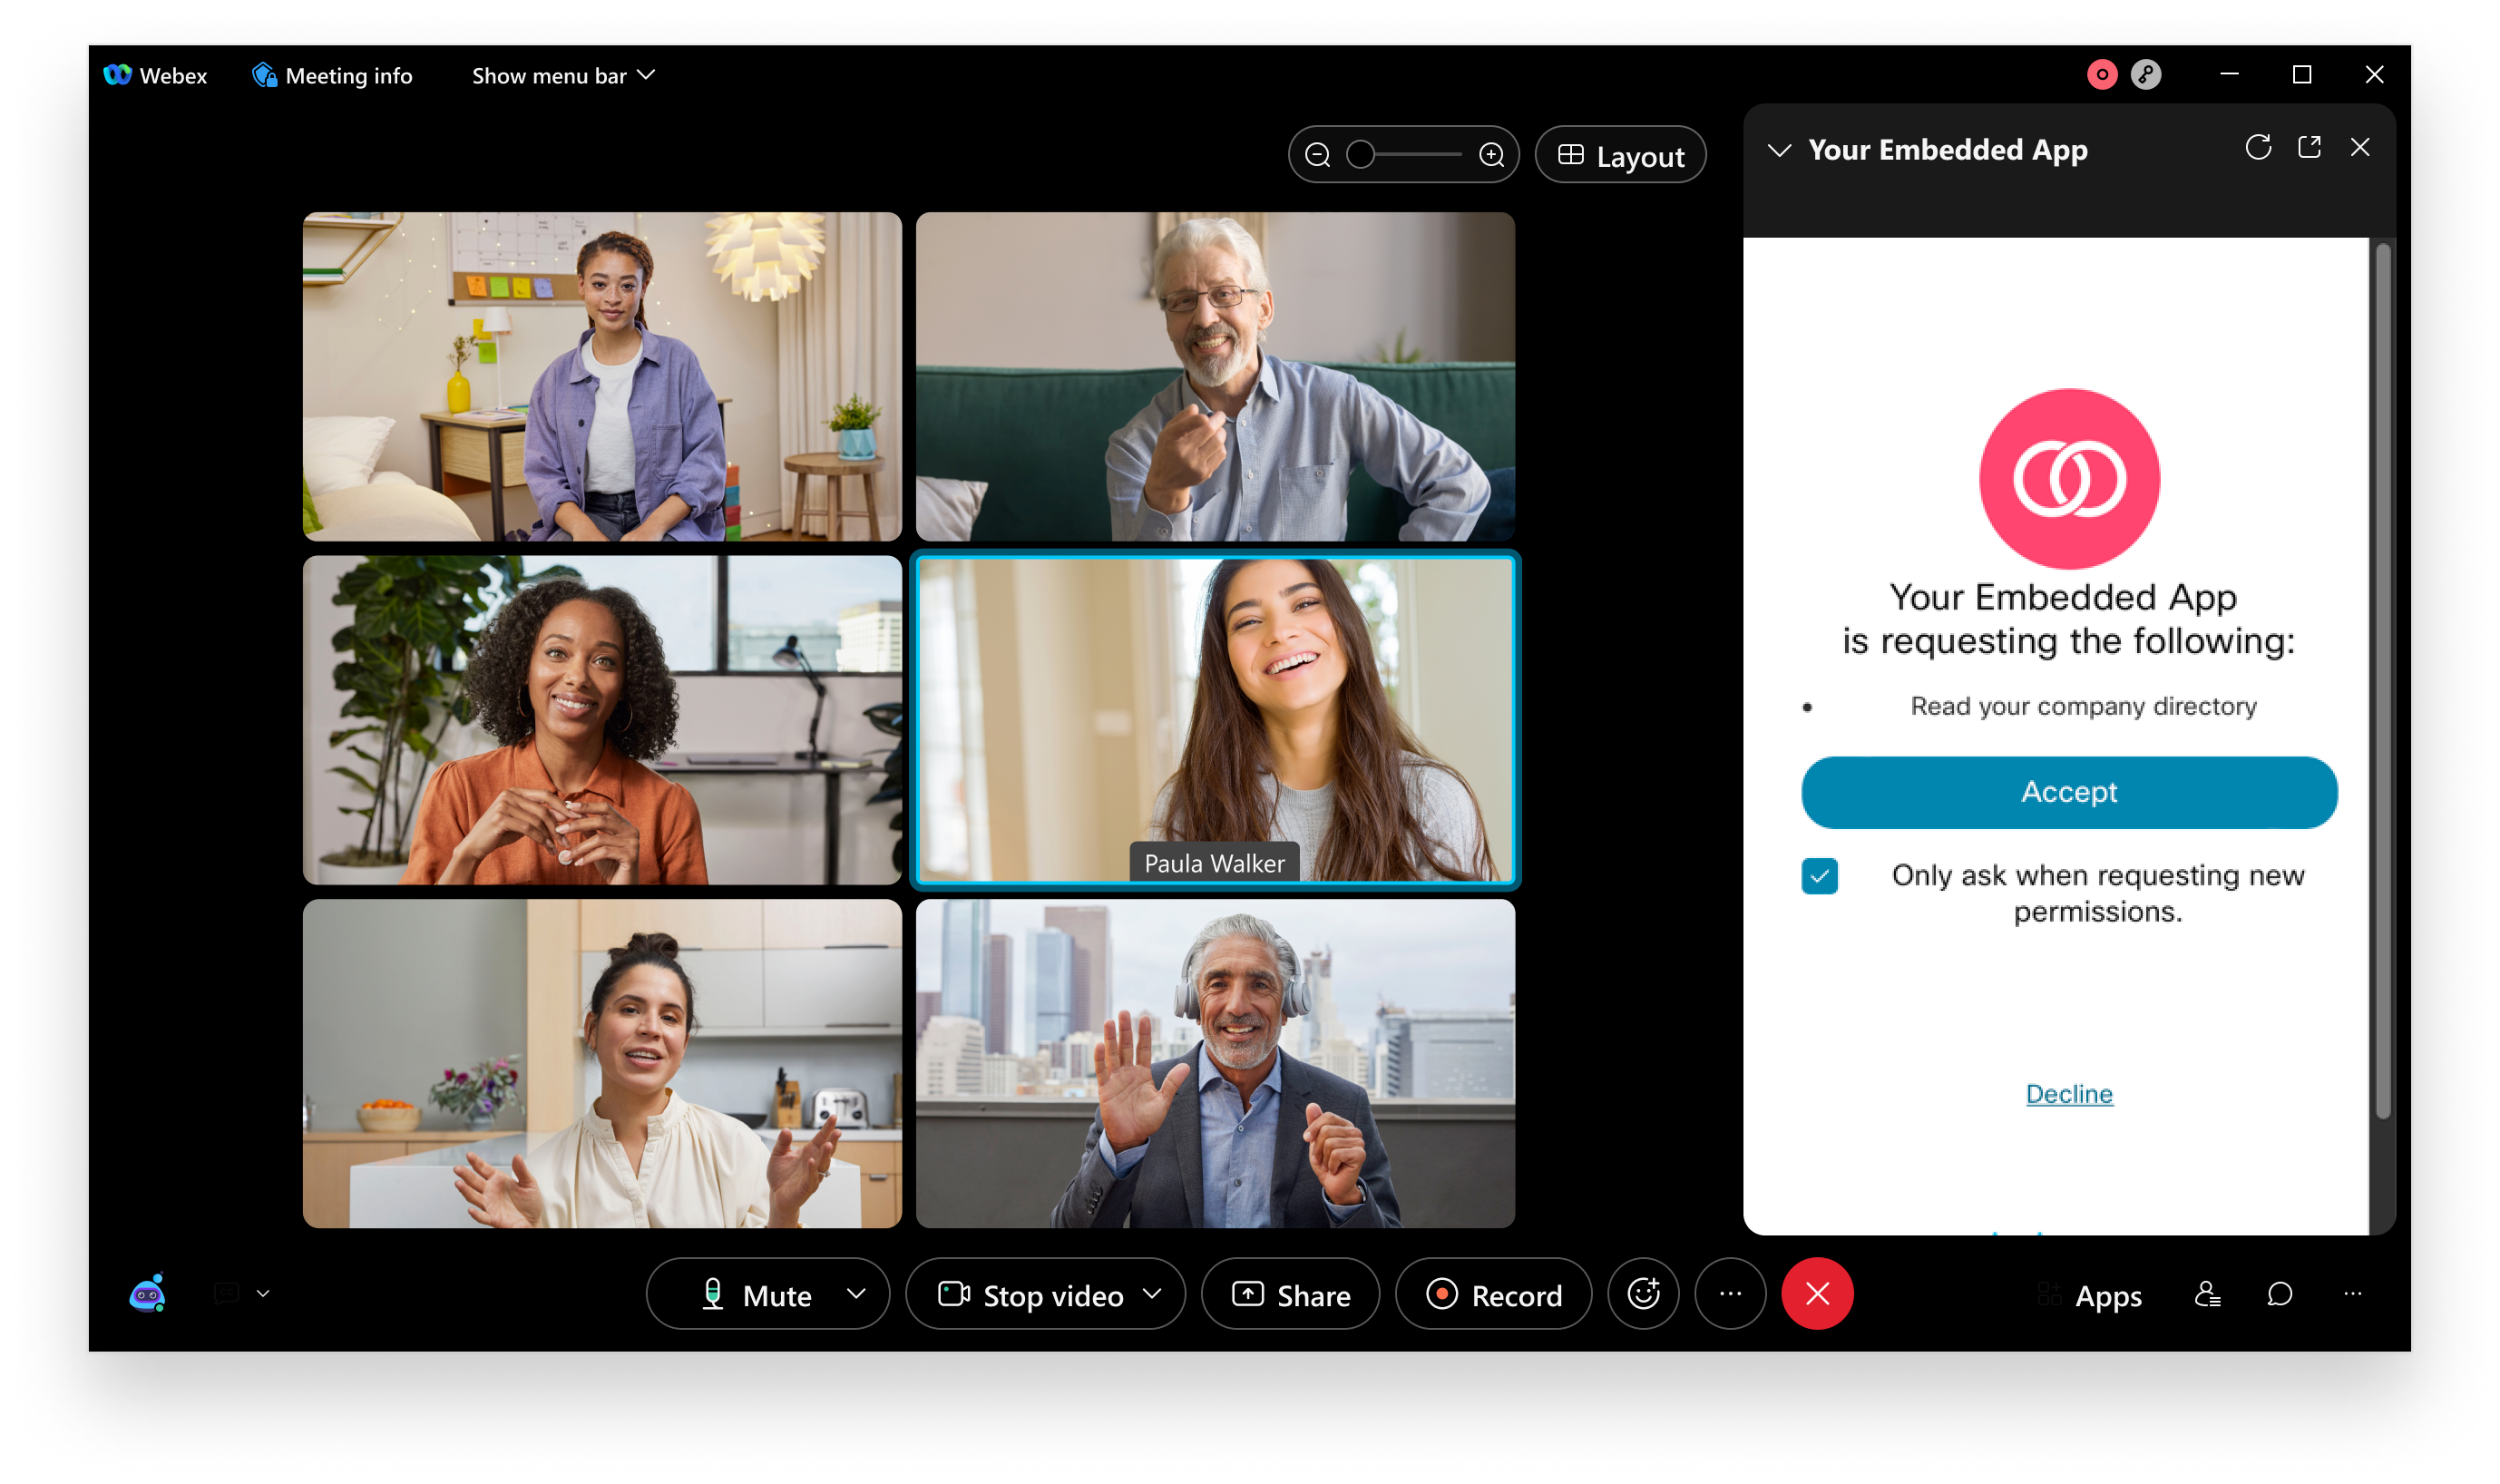
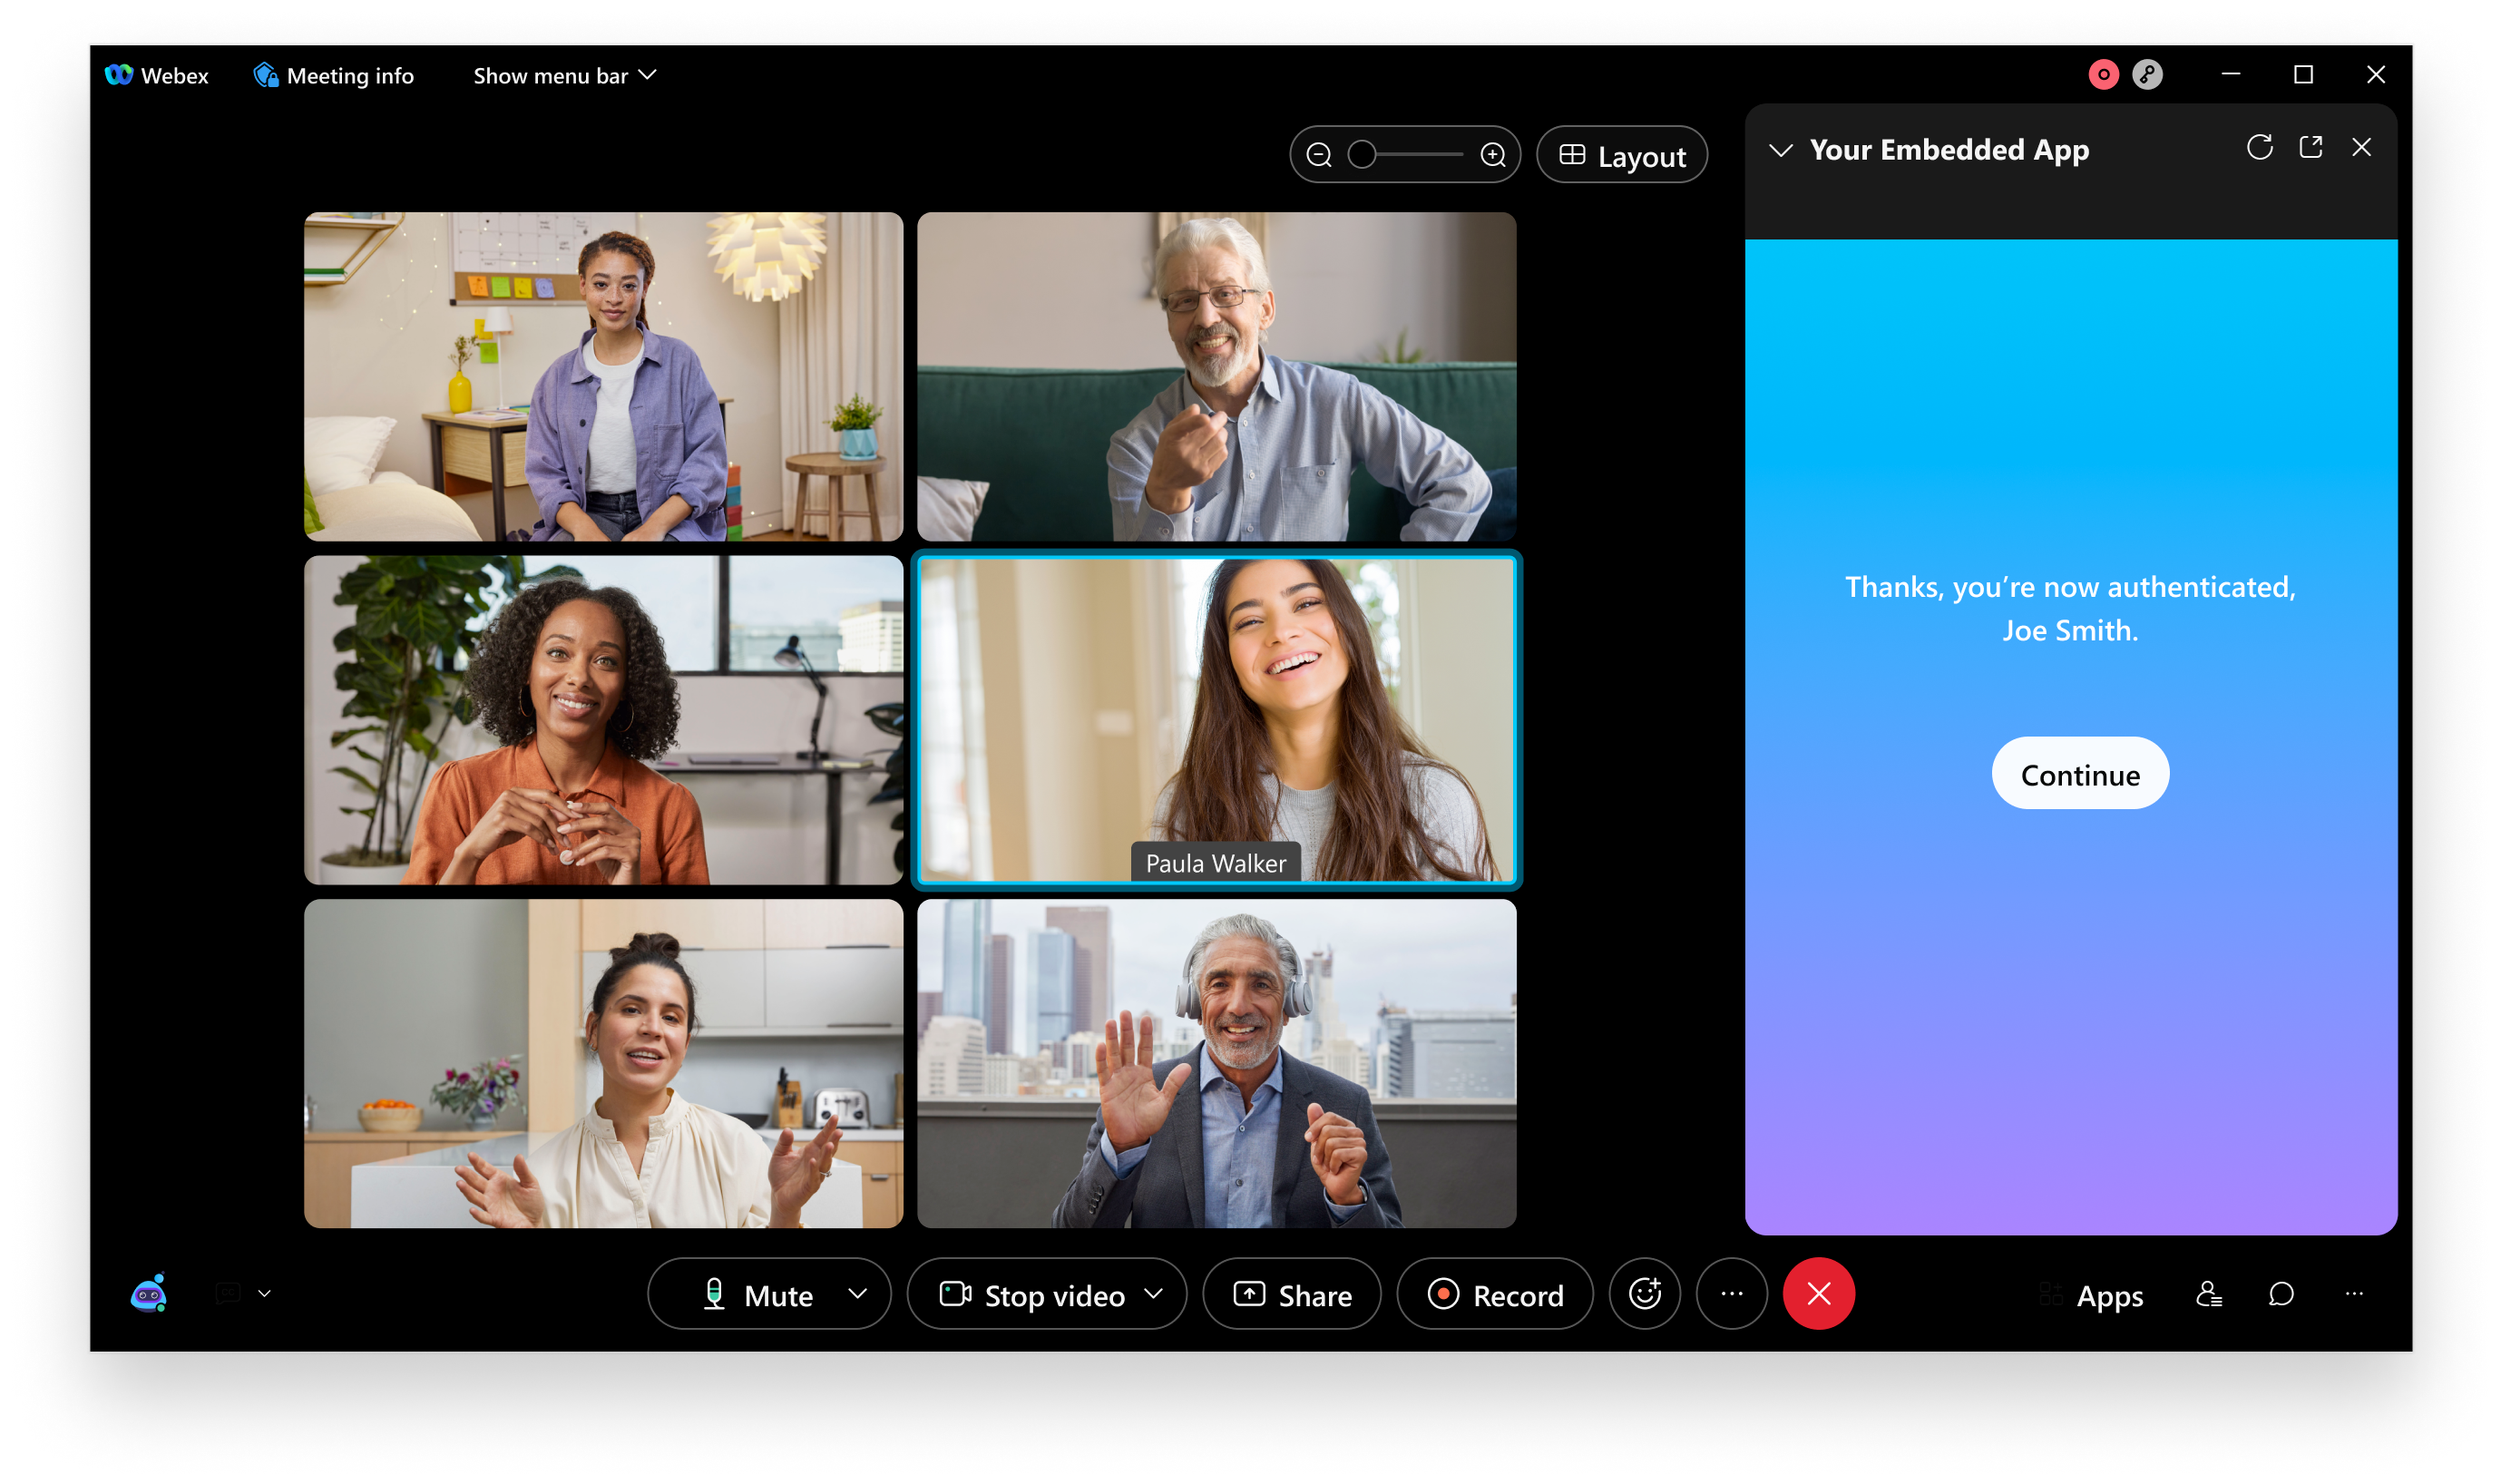
Once the user accepts the request they are redirected to your integration's specified Redirect URL, which is passed an authorization code from the authorization server. This page can exchange the auth code for an API access token to make Webex API calls (to the /v1/people/me API endpoint, for example) on the user's behalf and display the results in the embedded app, as shown below.
Clearing the Webex Cache
When iteratively testing changes to your embedded app you'll typically post your changes to your web host, and then click "Reload" in developer tools menu to refresh the app. Like stand-alone web browsers the Webex app caches your embedded app's assets for faster loading times, so you may need to clear its cache to view your app's most recent changes.
To manually clear the cache, see the instructions in the following Webex support articles:
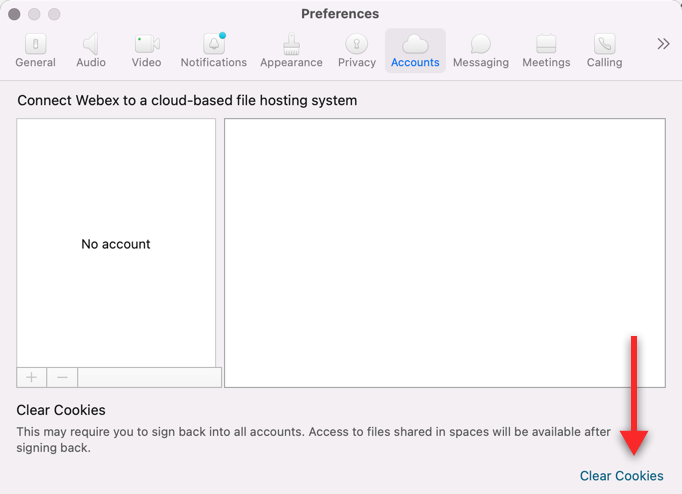
Alternatively, you can click Clear Cookies under the Accounts tab in the Webex app's preferences. (Note that this will also log you out of any current Webex sessions.)
Ensuring the Framework is Loaded and Ready
Once the embedded app framework is loaded and ready to use, it calls your app's onReady promise handler, for example:
// Create Webex app object and initialize your application
var app = new window.Webex.Application();

app.onReady().then(() => {
    console.log("Framework is ready.");
}
However, if this code is parsed and executed before the framework's JavaScript library has finished loading, an 'undefined' runtime error will be generated since the window.Webex object doesn't yet exist. To avoid this you can either use the defer attribute on the <script> tag used to load the framework library, or modify your code to defer creation of the app object until window.Webex exists. Both of these approaches are described below. An approach for checking for window.Webex in a React app is also provided.
- Using the defer Script Tag Attribute
- Wait Until the Webex Object Exists
- Wait Until the Webex Object Exists in React
Using the defer Script Tag Attribute
When present on a <script> tag, the defer attribute indicates to the embedded web view in which your app is running that the script should be executed after the document has been parsed. Scripts with the defer attribute execute in the order in which they appear in the document. For this reason the <script> tag that loads the embedded app framework must be declared before any <script> tag that loads your application code, as shown below.
<head>
    <!-- Load the embedded app framework -->
    <script src="https://binaries.webex.com/static-content-pipeline/webex-embedded-app/v1/webex-embedded-app-sdk.js" defer></script>
    <!-- Load your app's main javascript file -->
    <script src="./index.js" defer></script>
</head>
With this setup your app's code is guaranteed to execute only after the framework is loaded. Without the defer attribute there's a chance that the window.Webex object will be undefined when your app's code attempts to use it.
Wait Until the Webex Object Exists
As an alternative to use the defer script tag attribute, your app code can defer creation of the main Webex app object until window.Webex exists. The framework will then automatically call your onReady() promise handler. For example, the following uses the setInterval() function before creating the app object.
// Declare app object:
var app;

// Wait for window.Webex
var checkForWebex = setInterval(function() {
   if (window.Webex) {
      app = new window.Webex.Application();
   }
}, 100); // check every 100ms

// Define onReady handler:
app.onReady().then(() => {
    console.log("Framework is ready.");
}
Wait Until the Webex Object Exists in React
The following code demonstrates an approach to checking if the window.Webex object is available in a React app using the Effect hook.
const [webexApp, setWebexApp] = useState(false);
useEffect(() => {
  if (webexApp) {
    return;
  }
  const _webexApp = new window.Webex.Application();
  _webexApp.onReady().then(() => {
    console.log("Webex App Ready");
    setWebexApp(_webexApp);
  });
}, [webexApp])
anchorManaging Private Embedded Apps
anchorPrivate embedded apps are the only publishing option available for Webex for Government (FedRAMP).
Members of a Webex organization can create a new Embedded App in the Developer Portal. By default, such apps are considered in-development and are only available to the user who created the app. They are not visible to any other Webex users in the same organization. A private app is an in-development app that has been approved by an org administrator for use by some or all of its members. Note the following about private apps:
- They are not available on App Hub or to users outside your organization.
- They don't need to be submitted to Cisco for any kind of approval. Webex organization admins have full control what apps are available to their users.
- Apps can be made available to all or some of the users in a Webex organization.
One use case for a private app is an existing internal app — a note taking app, for example — that a Webex org wants to make available to all of its users. Another example is an app under development to be submitted to App Hub that first needs internal beta testing. The org admin can make the app available to a select group of users for testing purposes.
Admins use Control Hub to approve in-development apps for use within their Webex organization(s).
To approve a private app for use within an Webex organization:
Sign in to Control Hub as a full administrator, and click the Embedded Apps tab.
Click the Private tab to view a list of currently approved private apps and in-development apps for which approval has been requested by the app developer.
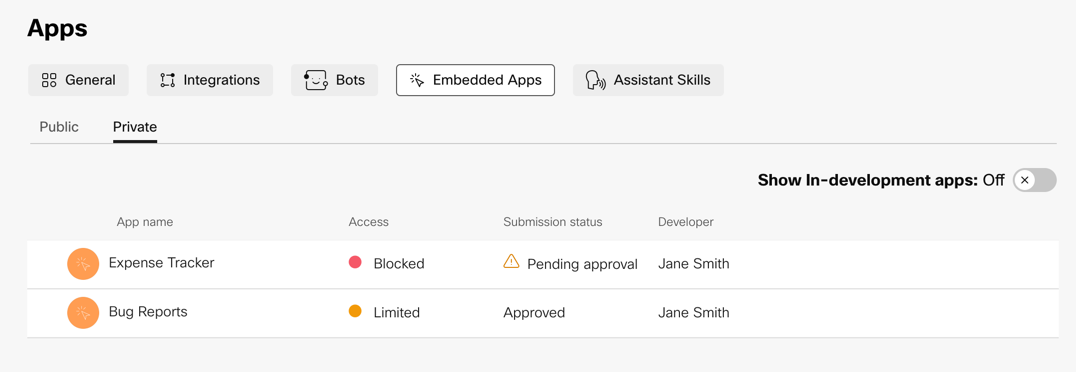
To include apps in the list that are in-development but have not yet requested approval, click the Show In-Development Apps option.

Select the private app you want to approve.
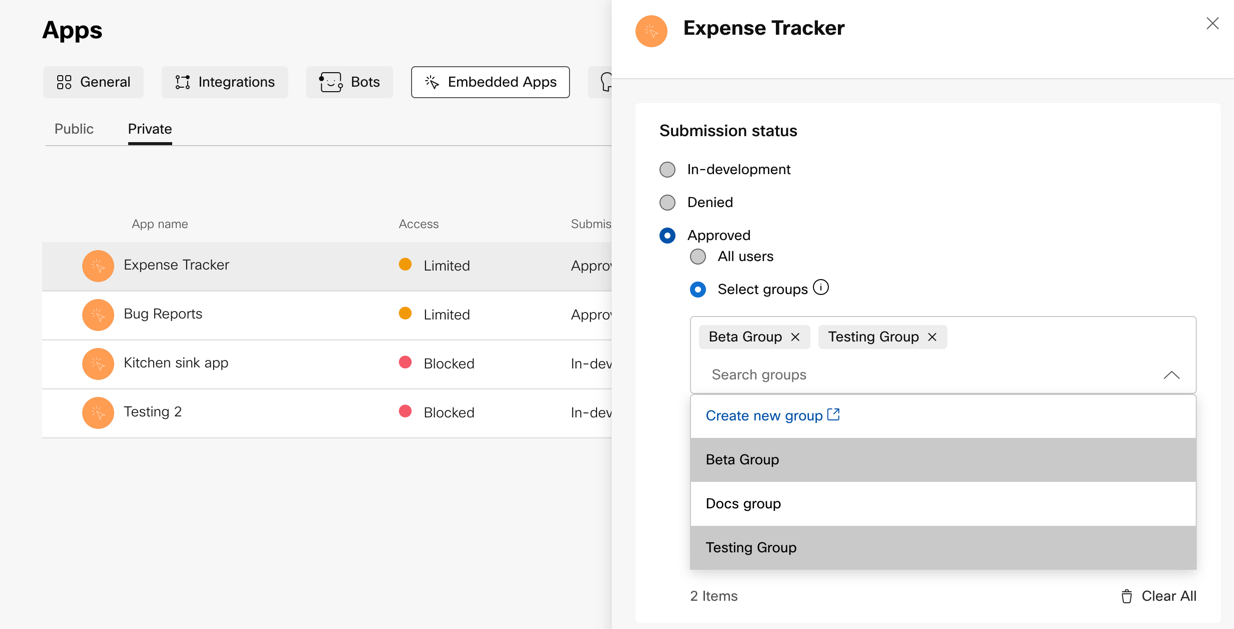
Select Approved under Submission Status and then do one of the following:
- Select All Users to make the app available to all users in the organization.
- To make the app available to a subset of users, click Select Groups and then select the group or groups you want to have access. See About Per-Group and Per-User Access for information about creating groups.
Click Done. The app will now be available in the Apps Gallery in a Webex meeting or space.
Requesting Approval of an Embedded Apps for Internal Use
When a Webex user creates a new embedded app in the Developer Portal the app is considered to be in-development. In-development apps are only available in the Webex app to the user who created the app in the Developer Portal. The developer of an embedded app can request approval from the admin to make it available to other users in the developer's Webex organization.
To request approval of your app for internal use:
- Open your My Apps page in the Developer Portal.
- Click the app you want to have approved.
- On the app details page click Request admin approval.

The current submission status is displayed.
anchorAbout Per-Group and Per-User Access
anchorBy default, embedded apps that are approved for use in a Webex organization are available in the App Gallery to all users in that organization. Webex organization administrators can optionally enable an embedded app for a subset of users in the organization, on a per-user or per-group basis.
Currently, you can use Control Hub to assign groups to embedded apps and the Groups API to create groups and manage group members.
Assigning Groups to Embedded Apps
Administrators use the Embedded Apps control panel in Control Hub to view groups and their members, and to assign groups to an embedded app. You can assign groups to public apps and private apps. In-development apps that have not been approved for by an org admin can not be assigned to a group. You cannot create or manage groups using Control Hub at this time. See Creating and Managing Groups.
To assign one or more groups to an embedded app:
Open the Embedded Apps control panel in Control Hub. The account you use to sign into Control Hub must have administrator privileges.
Select the Public or Private tab, then select the app to which you want to assign a group.
For public apps, in the Access panel select the Select groups option. For private apps this option is found in the Submission Status panel for approved applications.
Select one or more groups from the list you want to assign to the app. Filter the list by typing the group name you want to apply.
Click Done when finished.
For example, the following screenshots show groups being assigned to public and private apps.
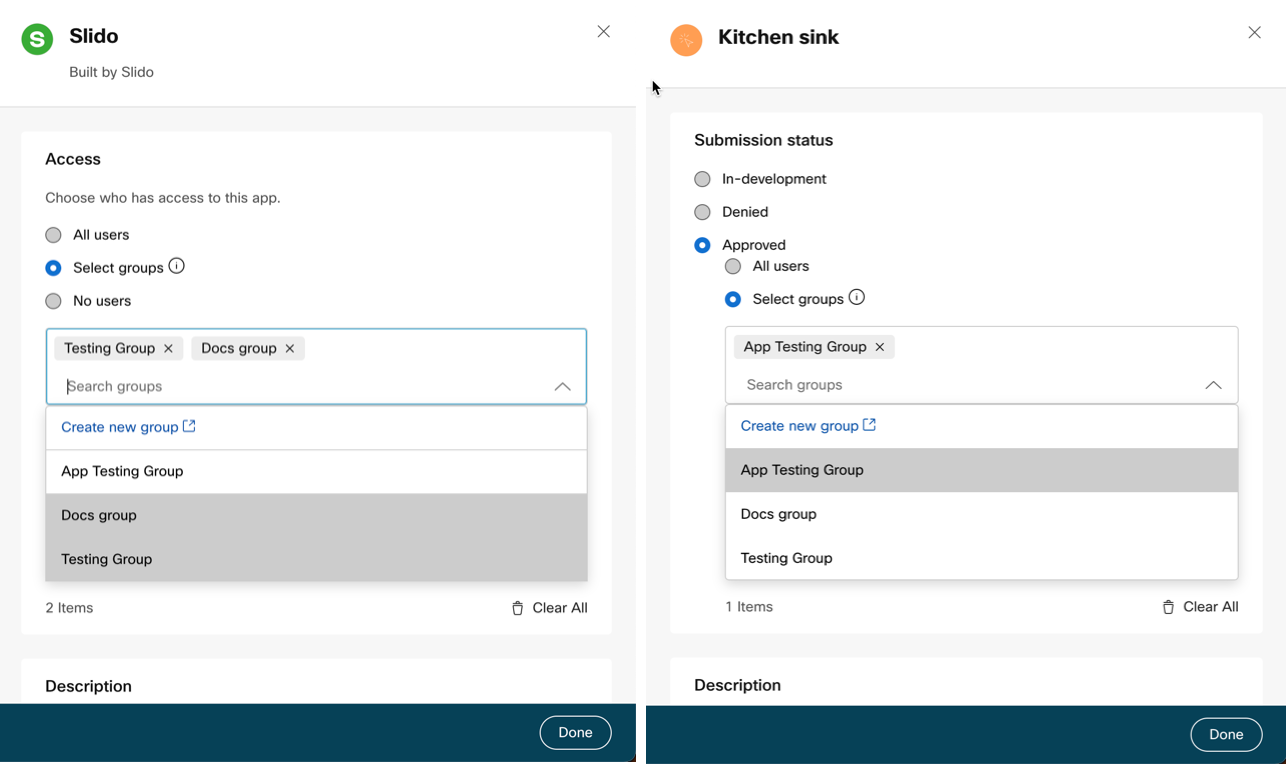
Creating and Managing Groups
To create and manage groups you use the Groups API. To use this API your user must be an organization admin. To manage groups and their users an access token with the identity:groups_rw (Read Write groups) scope is required. Searching and viewing members of a group requires an access token with a scope of identity:groups_read.
Creating a Group
You use the Create a Group endpoint to create a new group. For example, the following creates a new group named "Beta Group" with no members. Replace <TOKEN> with an access token associated with a Webex organization admin's account.
curl -d '{"displayName":"Beta Group"}' \
-H 'Content-Type: application/json' \
-H 'Authorization: Bearer <TOKEN>' \
-X POST https://webexapis.com/v1/groups
The response contains information about the newly created group, including the number of members.
{
  "id": "Y2lzY29zc....hNGQxZg",
  "displayName": "Beta Group",
  "orgId": "Y2lzY29z....YTRkMWY",
  "created": "2022-07-07T17:47:24.017Z",
  "lastModified": "2022-07-07T17:47:24.017Z",
  "memberSize": 0
}
To add members to a group when creating it you use the members parameter. This field takes an array of objects whose id field specifies the ID of the Webex users to add. You can use the the List People to query for users in your organization and obtain their IDs.
For example, the following creates a new group named "Beta Group" that contains a single member with ID <PERSON_ID>.
curl -d '{"displayName":"Beta Group", "members": [{"id":"<PERSON_ID>"}]}' \
-H 'Content-Type: application/json' \
-H "Authorization: Bearer <TOKEN>" \
-X POST https://webexapis.com/v1/groups
The response contains information about the new group, including a members array that lists the current members of the group.
{
  "id": "Y2lzY2...NhNGQxZg",
  "displayName": "Beta Group",
  "orgId": "Y2lzY2...TRkMWY",
  "created": "2022-07-07T19:19:19.998Z",
  "lastModified": "2022-07-07T19:19:19.998Z",
  "memberSize": 1,
  "members": [
    {
      "id": "<PERSON_ID>",
      "type": "user",
      "displayName": "user1@example.com"
    }
  ]
}
Updating a Group
To update a group, such as add or remove members, or change its name, you use the Update a Group PATCH API. For example, the following adds a member with ID <PERSON_ID> to the group with ID <GROUP_ID>.
curl -d '{"members": [{"id":"<PERSON_ID>"}]}' \
-H 'Content-Type: application/json'  \
-H "Authorization: Bearer <TOKEN>" \
-X PATCH https://webexapis.com/v1/groups/<GROUP_ID>
The JSON response object contains the updated members array with the newly added member.
{
  "id": "Y2lzY2...hNGQxZg",
  "displayName": "Beta Group",
  "orgId": "Y2lzY29z...TRkMWY",
  "created": "2022-07-07T22:00:27.231Z",
  "lastModified": "2022-07-07T22:07:38.143Z",
  "memberSize": 2,
  "members": [
    {
      "id": "Y2lzY29zc",
      "type": "user",
      "displayName": "user1@example.com"
    },
    {
      "id": "<PERSON_ID>",
      "type": "user",
      "displayName": "user2@example.com"
    }
  ]
}
By default, users in the members array are added to the specified group. To delete a group member, add "operation": "delete" to the array object. For example, the following deletes a member with ID <PERSON_ID> from the group with ID <GROUP_ID>.
curl -d '{"members": [{"id":"<PERSON_ID>", "operation": "delete"}]}' \
-H 'Content-Type: application/json'  \
-H "Authorization: Bearer <TOKEN>" \
-X PATCH https://webexapis.com/v1/groups/<GROUP_ID>
Of course, you can combine add and delete operations in the same operation. The following deletes one member with ID <PERSON_1_ID> and adds another with ID <PERSON_2_ID> to the specified group.
curl -X PATCH https://webexapis.com/v1/groups/<GROUP_ID> \
-H 'Content-Type: application/json'  \
-H "Authorization: Bearer <TOKEN>" \
--data-binary @- <<BODY
{
    "members": [
        { "id": "<PERSON_1_ID>", "operation": "delete" },
        { "id": "<PERSON_2_ID", "operation": "add" }
    ]
}
BODY
anchorThird-Party Single Sign-On (SSO) Support
anchorinitiateSystemBrowserOAuth is not supported in Webex for Government (FedRAMP).
Embedded apps can use third-party SSO providers to authenticate their users using the initiateSystemBrowserOAuth() method. Since some identity providers have security policies that prevent the OAuth flow from completing in an embedded browser, initiateSystemBrowserOAuth() delegates the OAuth SSO authorization flow to the system browser.
Notes:
- The
initiateSystemBrowserOAuth()method returns an authorization code after the user authenticates with the ID provider. The embedded app is responsible for exchanging the authorization token for an access token or ID token from the ID provider. - The redirect_uri parameter of the authorization URL passed to
initiateSystemBrowserOAuth()must be set to https://oauth-helper-prod.wbx2.com/helperservice/v1/callback. This URL points to a helper service managed by Webex that correlates the authorization code returned by the ID provider with the embedded app that made the request.If you're developing an app for Webex for Government (FedRAMP), use the following callback URL: https://oauth-helper.gov.ciscospark.com/helperservice/v1.
- Your embedded app's Valid domains configuration option must include the domain for the SSO page (accounts.example.com, for example).
- The Webex client appends a
stateparameter to the authorization URL set to a cryptographically random string. Apps should not add their ownstateparameter to the authorization URL as it will be over-written. - The
initiateSystemBrowserOAuth()method is supported by version 1.5 and later of the embedded apps SDK. You can use the isSdkSupported method to determine if this feature is available to your app. See Framework Versioning and API Support for more information.
The following code shows the basic code to initiate a single sign-on flow. The code to exchange the authorization code for an access or ID token is not shown.
// Variable to hold authorization code from ID provider
let authCode;
// Initiate SSO flow in system browser
app.initiateSystemBrowserOAuth("https://accounts.example.com/auth?client_id=...&redirect_uri=https://oauth-helper-prod.wbx2.com/helperservice/v1/callback")
  .then(function (response) {
    // Promise fulfilled, get authorization code from JSON response
    authCode = response;
    console.log(`Got authorization code: ${authCode}`)
    // Exchange authorization code for a token with ID provider.
    // This part of the OAuth flow is the responsibility of the embedded app, for example:
    // exchangeCodeForToken(authCode);
  })
  .catch(function (reason) {
    console.error("initiateSystemBrowserOAuth() failed with reason=",
                   window.Webex.Application.ErrorCodes[errorcode]
    );
  }